Subforms are a valuable part of Forms design due to the fact they support large numbers of functions. The key features include:
- Capturing multiples of repeating data: (for example, an expense record will be a date, description, amount etc. This has to repeat, as a whole, for the form filler).
- Time saving: Building re-usable components of forms(eg customer details, address records)
- Consistency: designing parts of forms that look the same, regardless of who the form designer is
- Different layouts for data capture: subforms support several views, including a summary mode, whereby lots of data can be captured, but only a summary of the information is presented in the screen
- Devolved Form Construction: Some aspects of form building take a little longer and require knowledge of other systems, for example embedding a postcode-lookup. More complex subforms can be constructed by technical designers that are then used by others in the organisation.
- Permit reuse of look ups within a form (no need to make copies of look ups, ie same address look up can be used more than once on a form for different addresses, by being presented within a subform)
- Enables re-use of standard lists eg ethnicity, locations
- When you make a change on a subform, each process needs to be published separately as some may have open cases and you may not wish the changes to be applied automatically
Table of Contents
Subforms & Mandatory Behavior
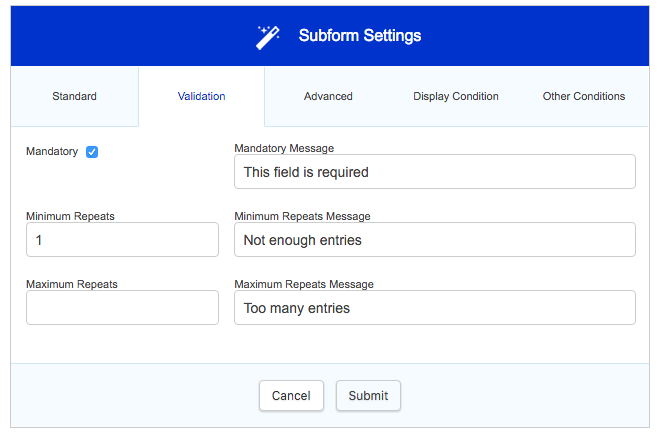
Subforms, like normal forms, can contain mandatory fields. There is one slight difference in the way they are configured; in a regular form, the form designer simply changes the properties of the required fields to mandatory. In a subform, the same process needs to be carried out, however the subform itself needs to be set as mandatory too (i.e. in the design view of the form, open the subform properties and set the subform to be mandatory on the Validation section). You also need to set the Minimum Repeats value in Validation to at least 1 if the subform is set to be Repeatable.
Subforms can also be made mandatory depending on the input in the form so far. Thanks to John at Sandwell for coming up with a way to make this work in the platform!
To do this, you will need to create a field with a calculation to work out whether an entry is needed on the subform (no = 0, yes = 1). This token is then used in the subform in the value for minimum repeats.
Subforms & Main Form Fields
Subforms can pull in values from the main form. This only works in the subform fields all have unique data names compared to the main form. This is done via default value. For example if in the main form you have a field with the data name 'name' you can pull this into the subform by adding a field and giving this the default value {name}.
Carrying Over Data Collected by a Repeatable Subform from One Stage to Another
You are able to present data collected by a repeatable subform in another stage of the process by having exactly the same subform in both stages. The subforms must also have the same data names. Ensure that the subform is read-only if it is just for viewing purposes.
Subforms & Repeating Behavior
As previously mentioned, subforms can be flagged to be ‘repeatable’; this means that, during form filling, multiple instances of the subform can be captured. There are a variety of options to control this behaviour:
- Minimum and Maximum Repeats (under the validation properties): This allows configuration of the maximum number of times a user can make a subform repeat in the page and the minimum (tokens can be used to define repeats). (For example, to capture at least one ‘complete’ record, configure the Minimum occurs to 1, and set the fields on the subform to be mandatory).
- Disable Adding, Editing and Deleting : this restricts the form fillers ability to add,remove or edit records of a subform. A good example of this would be if 5 records are needed to be captured, the Minimum Repeats (as above) could be set to 5, with the required fields on the subform set to mandatory, and Allow Adding / Deleting unchecked.
- Subform repeats can be controlled by data lookups (i.e. pulling data in from other systems via a webservice or database query). This is covered in the Lookups section below.
- Row counts/numbering - suggested options are on the customer forums. Please also see this article for more information.
Sometimes customers can miss the 'Add Record' button on a subform. If you are concerned about this we recommend:
1. You can change the button's appearance using CSS. This could be used to make the button more prominent.
2. You can change the text of the button in the subform's advanced settings. This can be used to make the button more relevant (eg. Add household member, Add previous job)
3. Using a popup style subform, which will hide the fields and force the user to click the add button to add a record.
4. Adding additional static text to the form to highlight the need to press the button to the customer.
Total Fields
Total fields are an automated way of keeping a running total of any number field type embedded into a subform that repeats. When a form filler fills in a form using this feature, the running total is kept as a visual at the foot of the subform. To set this behaviour up:
- Create a subform
- Ensure it has at least one number field on it
- Flag the subform as repeatable and Summary display style
- Select your field in the Total Column field on the Advanced page of the Subform properties
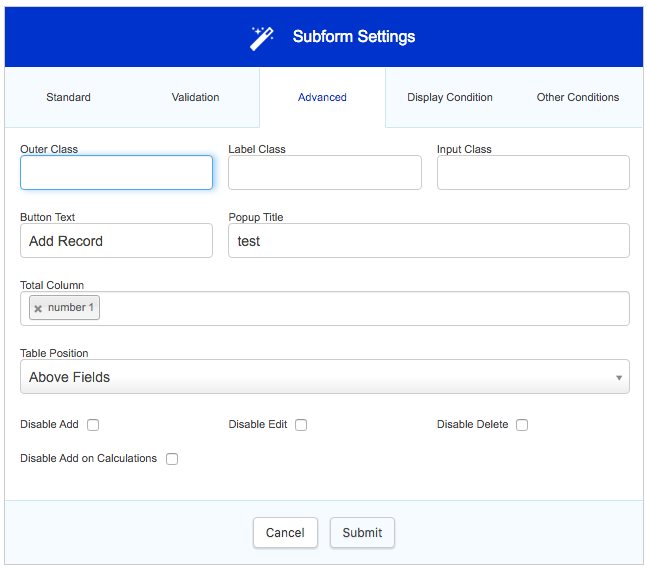
You will now see a Total row which will automatically calculate a running total for the field selected

Subform Layouts
Subforms support multiple layouts to aid different form designs:
- Popup: This opens the subform in a popup window
- Inline: This displays the subform in line in the parent form
- Summary Columns (this is the default): If a subform is repeatable and large, then this is likely the best option. To the form filler, in the body of the form, a summary of the subforms content is displayed. Each record can be edited individually, but by selecting it, the form filler is taken to a separate screen showing the expanded content of the subform. To setup a summary subform, the subform needs to have summary fields in it; this is accomplished by editing the individual field within the subform and flagging them as ‘Summary’ in their properties. Please note, you can only display a total of 6 summary fields. If the data contained in columns is lengthy - then the data may not fit on the screen
- Collapsible: This is similar to Inline but when repeatable, each entry collapses after entry and can be expanded to view previously entered contents
Subforms & Tokens
Subforms have a profound effect on tokens; when the token for a field on a subform is required, it is important to append the subform name into the token with a ‘/’ character in between. For example, if I have a subform with a data name of ‘subform1’, and on that I capture a field with a data name of ‘name’, then the token to retrieve that corresponding data is as follows: {subform1/name}. You cannot reference more than one subform in a single token so if you require a value from a nested subform, you will require a helper field in each level of subform to pass the field value into the parent form.
Lookups
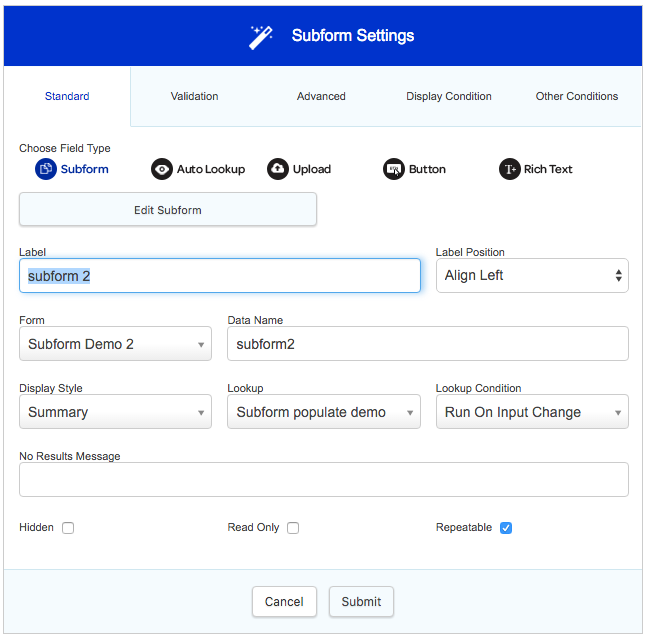
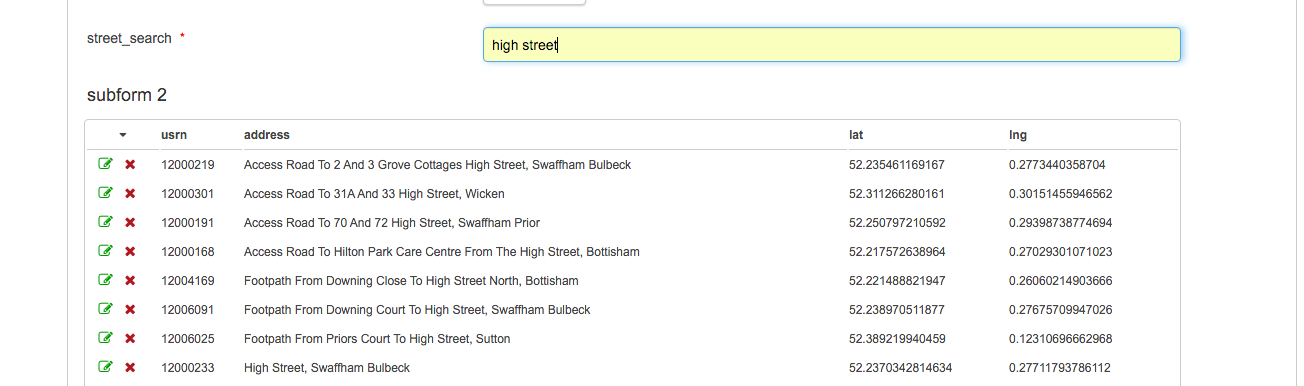
You can set a lookup to run against a subform set to repeatable to populate it automatically. To do this, create a subform which contains fields with datanames which match the values returned by your lookup, set the subform to be repeatable and then select your lookup in the Lookup field as shown below
An example below shows a subform populating with repeating address data triggered by a search field in the parent form
You can also set lookups in repeatable subforms to run on display and input change while having a button allowing you to make changes to that subform. This would mean that when the subform loads, the results will automatically appear and if changes are made, the lookup will run again. The Display Style of the subform needs to be set as 'Popup' while the Lookup Condition should be 'Run on display and input change'.
Database Integrations and Repeatable Subforms
Populating the Subform Records via the Database
It is not possible to use a presubmission database integration to populate the same field of every row/entry in a repeatable subform. The database is not able to populate the relevant field of each entry separately because there is no way of it distinguishing between each entry in the subform when it tries to do so all at the same time.
You can, however, use a lookup within the repeatable subform itself. This is because each row is being populated by the database one at a time. You can either run the lookup on a button or use an autolookup. The only downside to using a lookup within the subform is that the database will be altered every time the lookup runs, even if the record is never added to the subform and if the form is never submitted.
Populating the Database via the Subform Records
Propagating record changes and deletions for a repeatable subform into a database is problematic for deletions, because if you delete a row from a subform there is no data to repeat against. This means that no database integration is called and there is no way of deleting the record from the database.
There are two approaches you can take to propagate deletions from a form into a database table.
- Disable deleting in the subform. Instead have a Y/N field inside the subform to mark a record for deletion. You can then test this in your integration conditions and delete when required.
- This is the safest option.
- Store a date last updated in your database table and use delete statements to reconcile records against the database. Update every row that you find in the subform to set this to now(), then run a delete statement that will remove records that have an older date last updated.
- While this should be logically sound, there is a risk that concurrent use could cause unintended deletions and care needs to be taken over how long it could take to run through all the statements.
- To detect whether a field has changed, populate a hidden field with the original row values (you can just concatenate them into one field, rather than having one field for each DB column). You can then compare the values in the editable fields with the original in a calculation, and use this to determine if an update is needed. In most cases this is overkill - there isn't much of a downside to updating a DB record to the original values unless you expect high levels of concurrent use.
If you're after a basic CRUD functionality (Create, Read, Update, Delete), it may be worth using two subforms: one for new records that is linked to an INSERT integration; and one for existing records that has adding and deleting disabled and populates from a lookup, which would be linked to the UPDATE and DELETE integrations. These integrations are best run on submission.
Other Tips and Tricks
We have specific functionality for running an SQL query against rows of data in a repeatable subform (note: this does not apply to subforms inside of other subforms, known as 'nested subforms', which are neither recommended nor supported).
You can use the following syntax in your SQL:
INSERT INTO table_name (column1, column2, column3)
VALUES ({subform1/field1}, {subform1/field2}, {subform1/field3})
You then can attach this integration to run on submission of the form, setting it to repeat against every entry of the relevant subform.
Please note that we don’t usually provide support for SQL integrations so we won’t offer support for any amendments to this
For more potential functionality, please see this Forum page.
Other Subform Properties
- Popup Title: This allows you to set a custom title for the modal for subform set to Popup display style
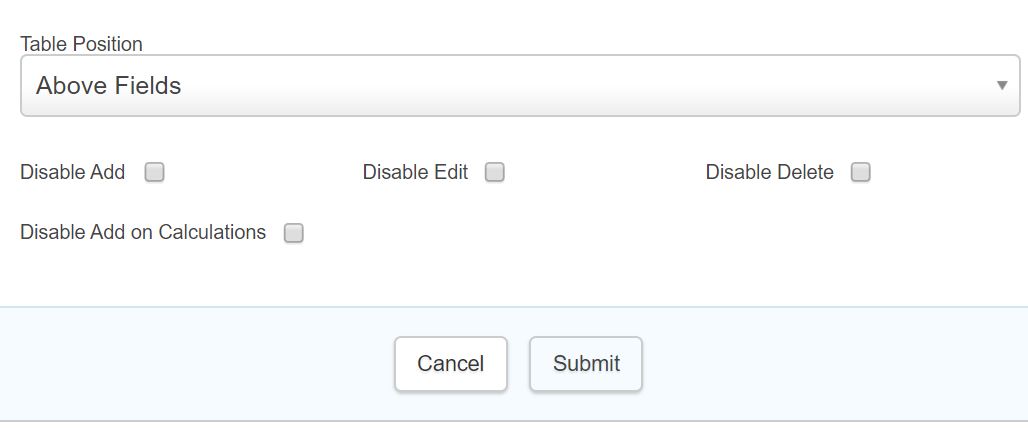
- Table Position: This defines if the summary table is displayed above or below the input fields
- Disable Add on Calculations: For calculation heavy subforms, you can disable the ability to add a subform row until all calculations have been completed.
Uploads in a Subform
Uploads can't be accessed from view data when using a repeatable summary subform, you will need to use another subform type if you will be accessing uploads from within a repeatable subform.
Referencing Individual Field Instances in a Repeating Subform
To reference an individual field instance in a repeatable subform you would need to use the following calculations to achieve this.
entry({subform_name/Field_name},1)
Returning the Line Number of a Row in a Subform
The field using count must be a text field, to demonstrate the solution we have an example form attached where there is a field inside the subform that takes the count value and adds it to one so that each entry has a column counting the relevant row.
If a user adds a count({field}) in the subform, they can increase it by one each time to have incremental IDs for each record added to the repeatable subform. This is done as follows:
- add a text field outside the subform with a count calculation with a dataname of, e.g. subformCount. The calculation should be as follows: count({subform1/text1});
- add a field inside your subform that will contain the row number, with a default value of {subformCount} + 1; then
- as you now add each row, you should see your row number increase incrementally.
Having a Maximum Number of Repeatable Subform Entries
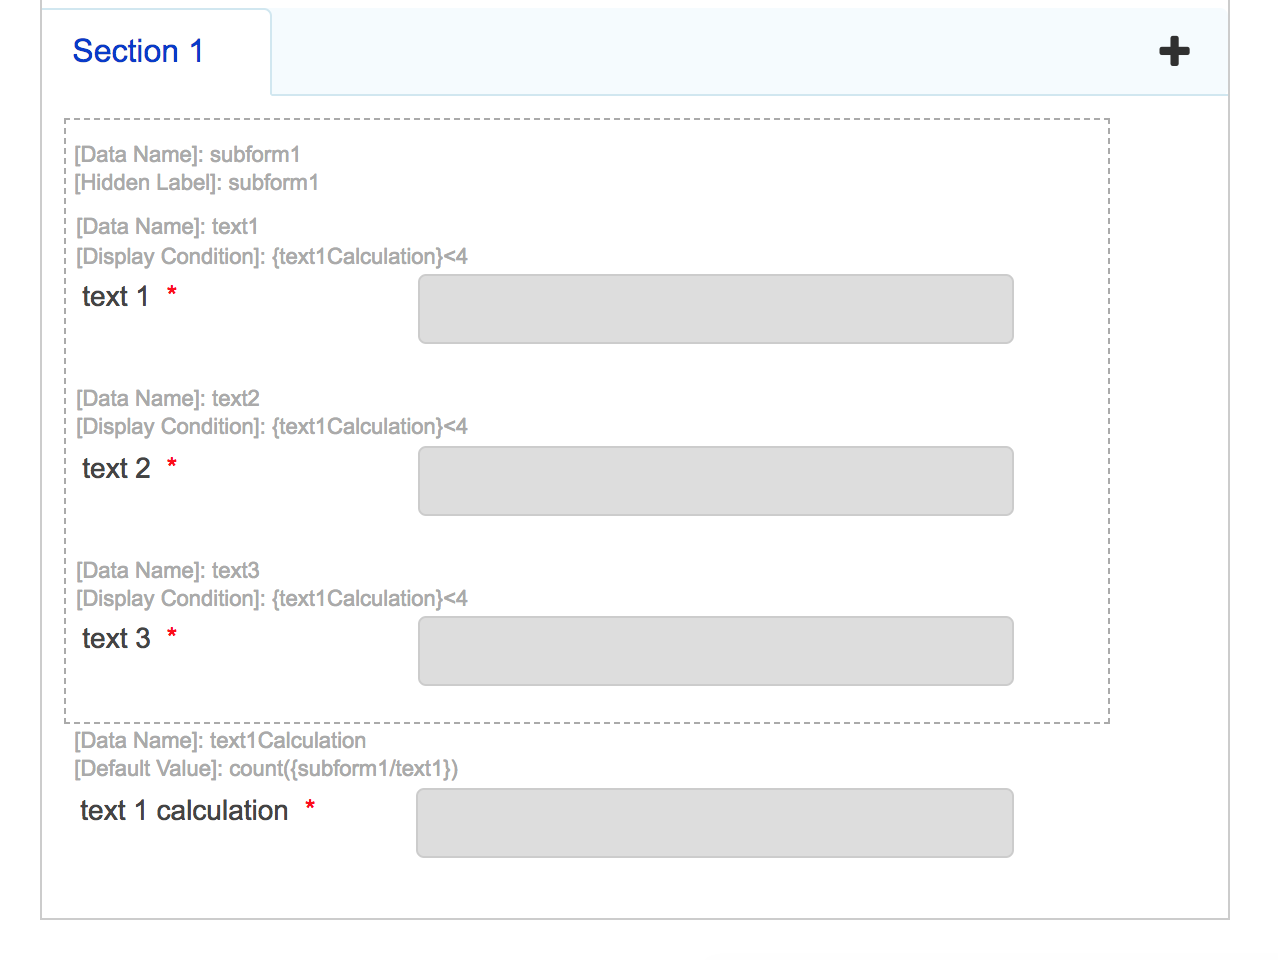
If you wish to have a maximum number of entries that a user can input into a repeatable subform you can use the count({field}) calculation. The 'count' function literally counts the number of instances of a field in a repeatable subform. A text field independent of the subform can be used to calculate the number of entries of the subform. This field can then be used in the display condition of each of the fields that are in the subform. If the display condition of the fields in the subform are no longer met, then they will not appear to the customer, preventing further entries. The 'Add Record' button will still be seen though.
In the form that is shown in the screenshot below, the maximum number of entries is 4. This example form is attached at the end of this document.
Subforms Display in Forms Designer and Database
A subform is designated by having (subform) displayed beside it in the Designer. However, if you view individual subforms in the database, they can often show as (published) but with no way to unpublish them.
This is because when you publish a process containing subforms, sometimes they register as being published, but they are not actually considered published by the database.
In this instance, you don't need to worry that the subform is actually published individually. It is a result of the interaction between the function of the system and the logic of the database.
Using Sub Forms in Printable and Email Integrations
When displaying subform information in a printable /email - there are often issues arising with the width of the table, and it becomes necessary to create a bespoke email or PDF integration. When using a repeatable subform you ma also need to use af:if or af:repeat to display the relevant information from the rows.
For V2 integrations, use a hash in token names to render html e.g {#textarea1}. A subform only renders as html where referenced directly as a token e.g. if in a printable you had {subform1} it would not display the html unless used as {#subform}. However, when being used in af:repeat you do not need to use the #
Determining When Certain Users Have Added an Entry to a Repeatable Subform
You might have a scenario where there is a back office stage that remains open until a certain number of internal users has added at least one entry to a repeatable subform. The idea is that this stage would remain open until every user has contributed. Although there is not a way of doing this naturally within the product, there are a couple of methods that you can use:
1. Custom JavaScript
This method involves using a lookup to retrieve a string of comma separated emails for all of the users which are required to contribute. This list would be stored in a text field.
In an HTML field you would have Javascript code which compares the array of users to the output of {subform/userfield}, which would be a field in the subform which displays the email of the user adding the entry. You would then have another hidden field which would contain 'false' if the repeatable subform does not contain all emails from the lookup list. The route condition of the stage would be set up to loop while this field reads 'false' and to continue when it reads 'true'.
2. SQL lookup
You could alternatively run a SQL lookup where the output of {subform/userfield}, again displaying the email of the user adding the entry, is iterated across and compared to a list of the emails of the users. That list can exist in the integration or in the customer's database. Again, if it matches set the hidden field to 'true'. If it's incomplete, set it to 'false', with the stage looping while 'false' and continuing when 'true'.
Note: We do not support the design of custom JavaScript or SQL.
Further useful reading:
top of page

