Table of Contents
Getting Started
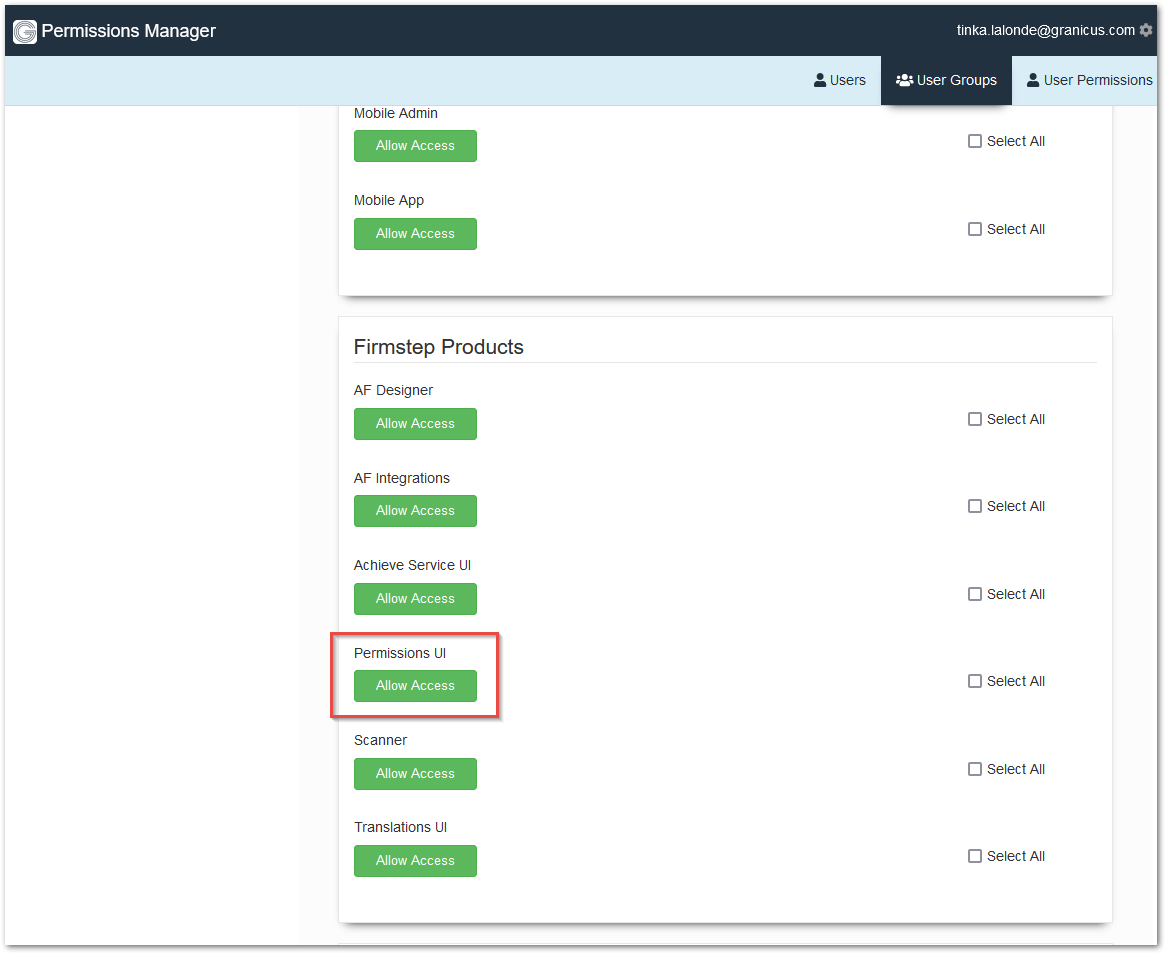
- In order to set up the new user, you must have access to Permissions Manager by being assigned to a group that has the permission named Permissions UI. To assign this permission, navigate to Permissions Manager > User Groups > Admin. Scroll down the page to the Firmstep Products section.
- Before setting them up in govService, the Active Directory user must first go to any of your govService sites and log in via FAM login (with their Active Directory username & password). They will see the following message:

- This will create a record for this user in Permissions Manager > Users. Find this record by searching there using the associated email address.
- If you are already on the page when they attempt to log in, refresh the page for the new information to display.
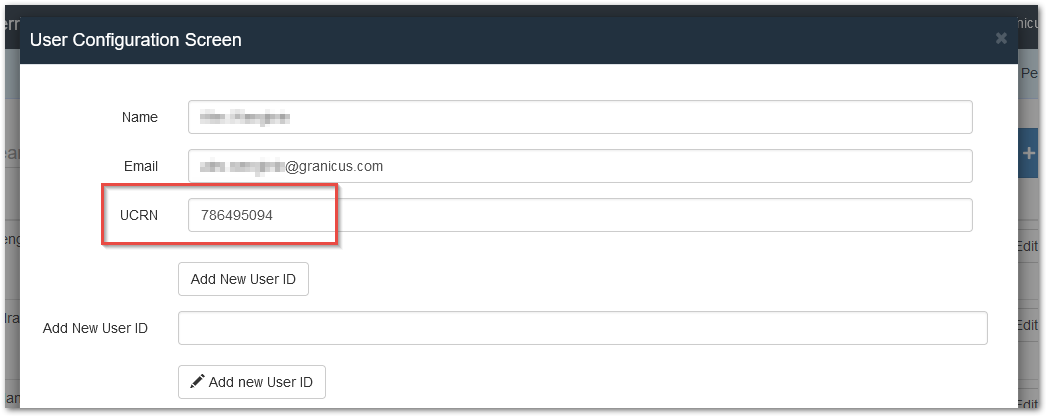
- Select Edit to bring up the User Configuration Screen to continue setting up the user.
- Take note of the UCRN displayed for the user. You will need this for connecting the user to permissions in different areas of the product.
- In the Authentication Providers section, select the checkbox corresponding to the FAM that the user will be using to log in, as well as any other applicable login methods.
- Note: This will not stop the user from logging in with the unselected methods, but their usual permissions will not apply when the unselected methods are used.
- In the text field that displays after you select the Authentication Provider associated with your Active Directory, type the Alias/Username with which this user logs in through Active Directory.
- In the Groups section drop-down menu, ensure that the checkbox for the "Widget API Broker User Group" is checked.
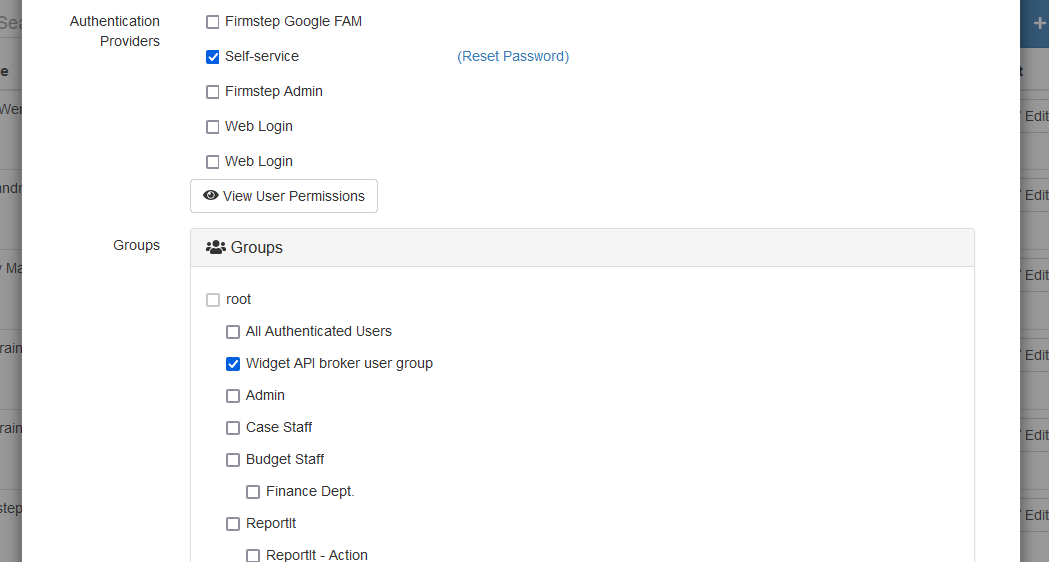
- Assign the user to any other groups needed.
- Select the Save Changes button.
Permissions Assignment Shortcut Using Active Directory Group
- We created this shortcut to remove the need to manually assign CSA permissions, as they will be automatically added when the AD user signs in the first time, creating their user record.
- Create a group in the Active Directory with the name FS-Integrated-CSA-Users. Add users to that group.
- If any of those users then logs into Service, they are automatically also added to the CSA group, causing them to obtain CSA permissions.
Setting up a new user with access to Service
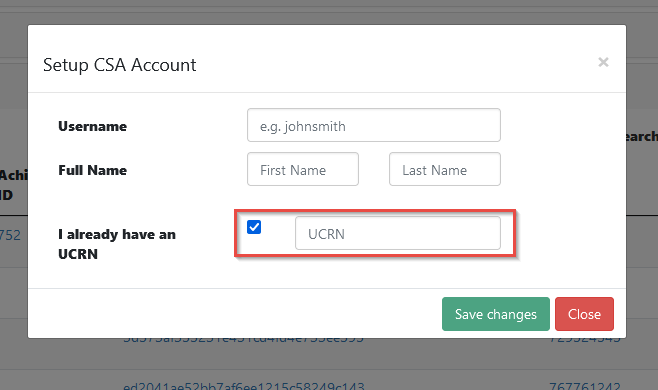
- Check the box associated with the "I already have an UCRN" field.
- Enter the UCRN you saved during Getting Started.
- The user being set up must next take the following steps:
- Log out of the site they logged into during the Getting Started steps
- Close their browser.
- In a new browser session, log into Forms via the FAM.
Setting up a new user with access to Forms
- Begin with the steps in Getting Started.
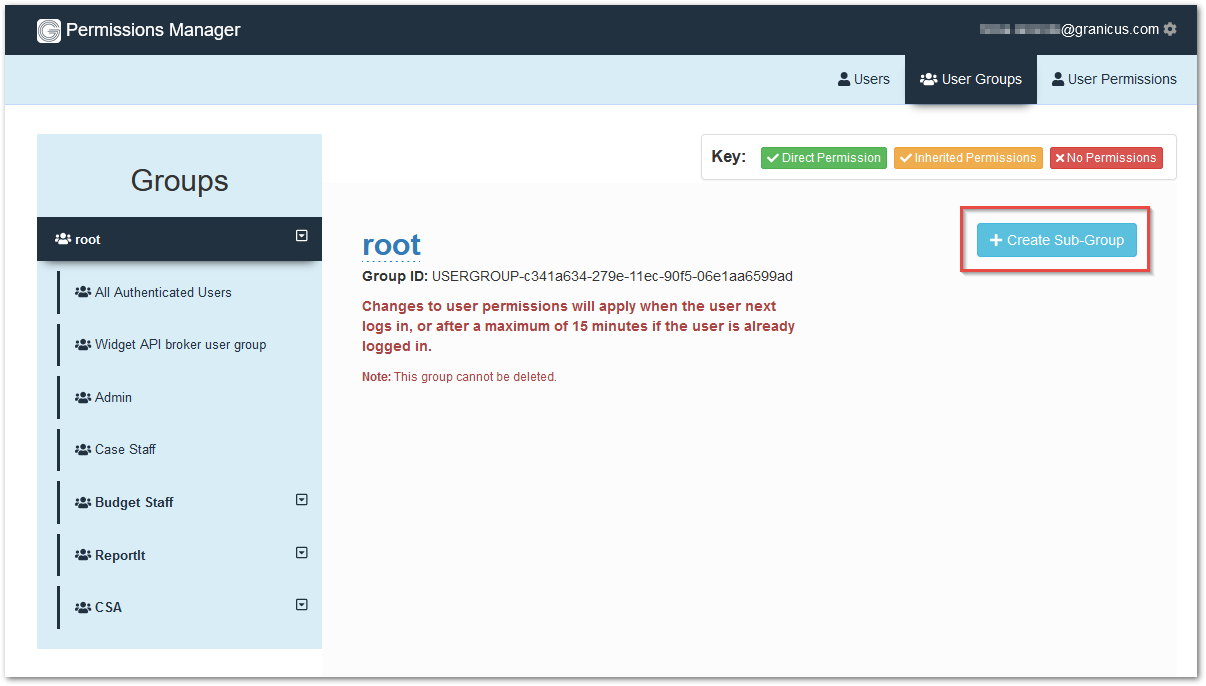
- In Permissions Manager > User Groups, select the Create Sub-Group button.
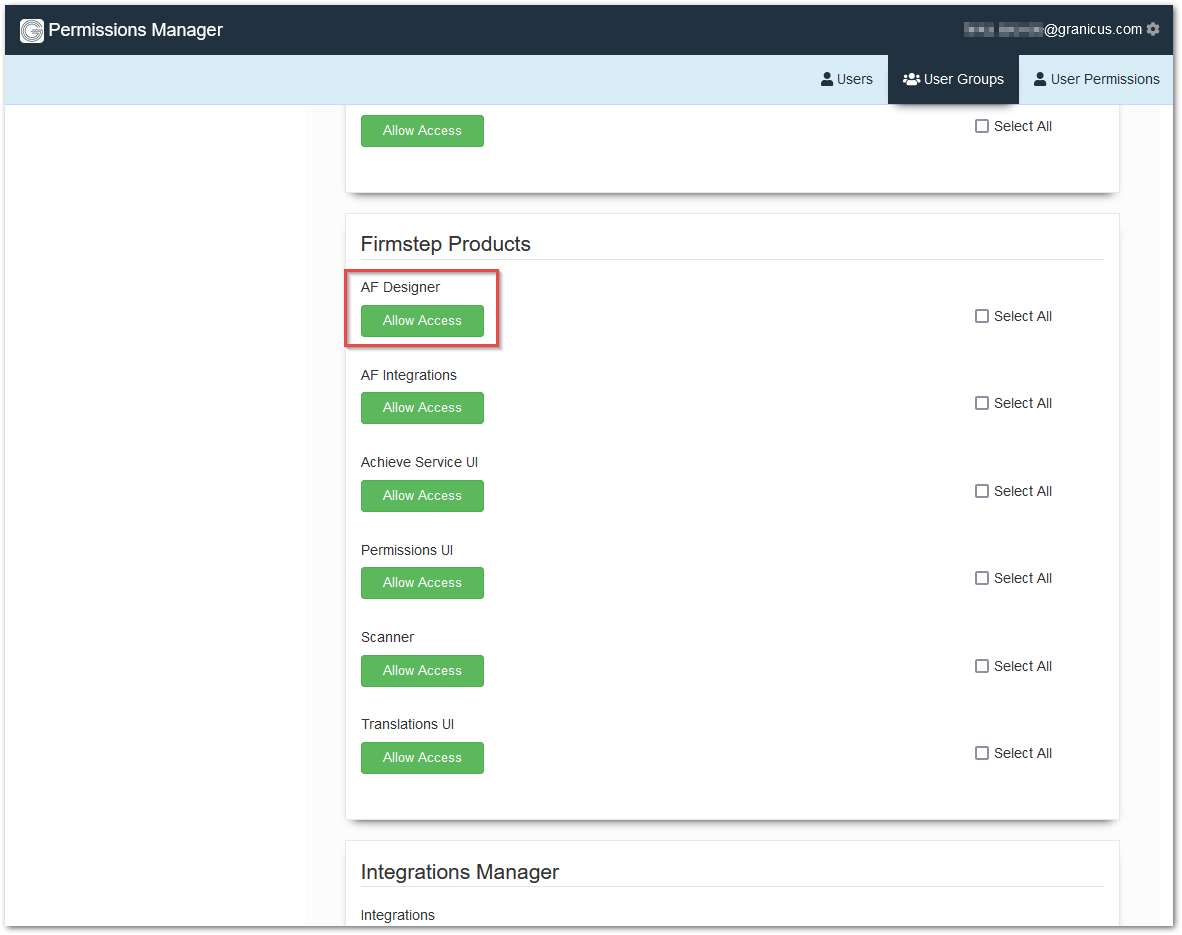
- Scroll down to the section Firmstep Products. Select the Allow Access button under the permission AF Designer.
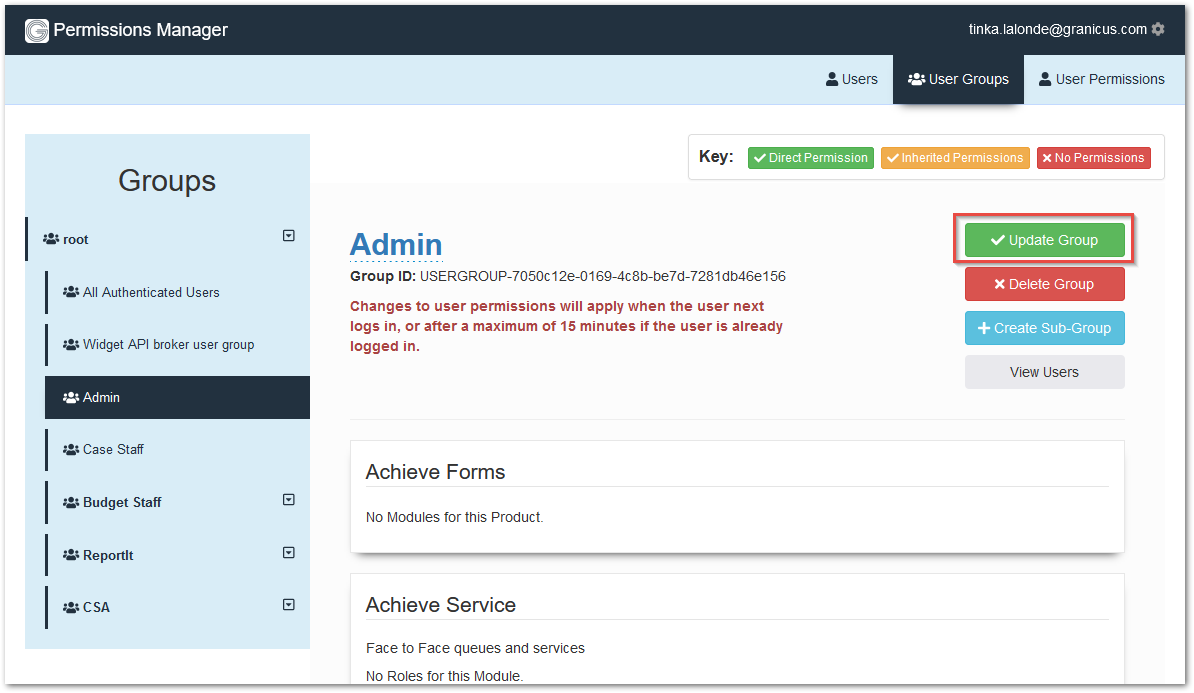
- In order to save these changes, scroll back to the top of the page and select the Update Group button.
- Under the Users tab, search for the user in question. Select Edit. Open the Groups drop-down menu. Add this user to the group you have just created by selecting the associated checkbox.
- Select the Save Changes button.
- The user being set up must next take the following steps:
- Log out of the site they logged into during the Getting Started steps
- Close their browser.
- In a new browser session, log into Forms via the FAM.
Setting up a new user with admin access to Staff Portal
- Begin with the steps in Getting Started.
- In Permissions Manager > User Groups, select the Create Sub-Group button.

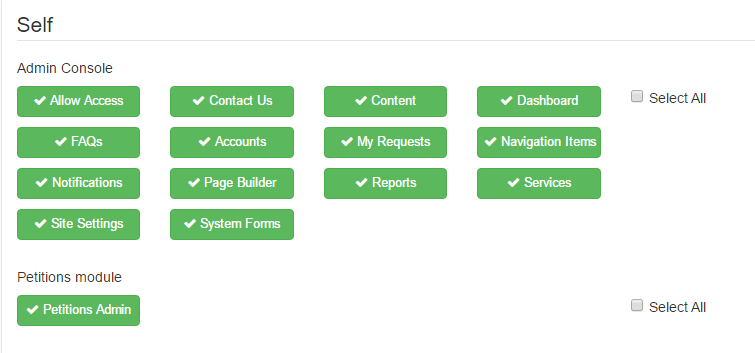
- Scroll down to the section Self. Select the Allow Access button under the Admin Console section.
- This will allow group members to have access to the Admin Console. The other buttons are related to accessing the content within the Admin Console.
- Select any button(s) associated with the area(s) of content to which the user should have access.
- In order to save these changes, scroll back to the top of the page and select the Update Group button.

- Under the Users tab, search for the user in question. Select Edit. Open the Groups drop-down menu. Add this user to the group you have just created by selecting the associated checkbox.
- Select the Save Changes button.
- The user being set up must next take the following steps:
- Log out of the site they logged into during the Getting Started steps
- Close their browser.
- In a new browser session, log into Dash/Staff Portal via the FAM.
- Select their name at the top right of the page.
- Select Admin Console from the drop-down menu.
FAM Login and Dash Tokens
User profile data for users logged in via Staff Portal affects which tokens are pulled through to Forms - see tokens page for more details
Further useful reading:
top of page

