Table of Contents
Introduction
Validation can be used in a number of useful ways to ensure correct information is filled in by the customer, and where appropriate error messages can be displayed to advise on correct input required.
Mandatory and Conditional Mandatory
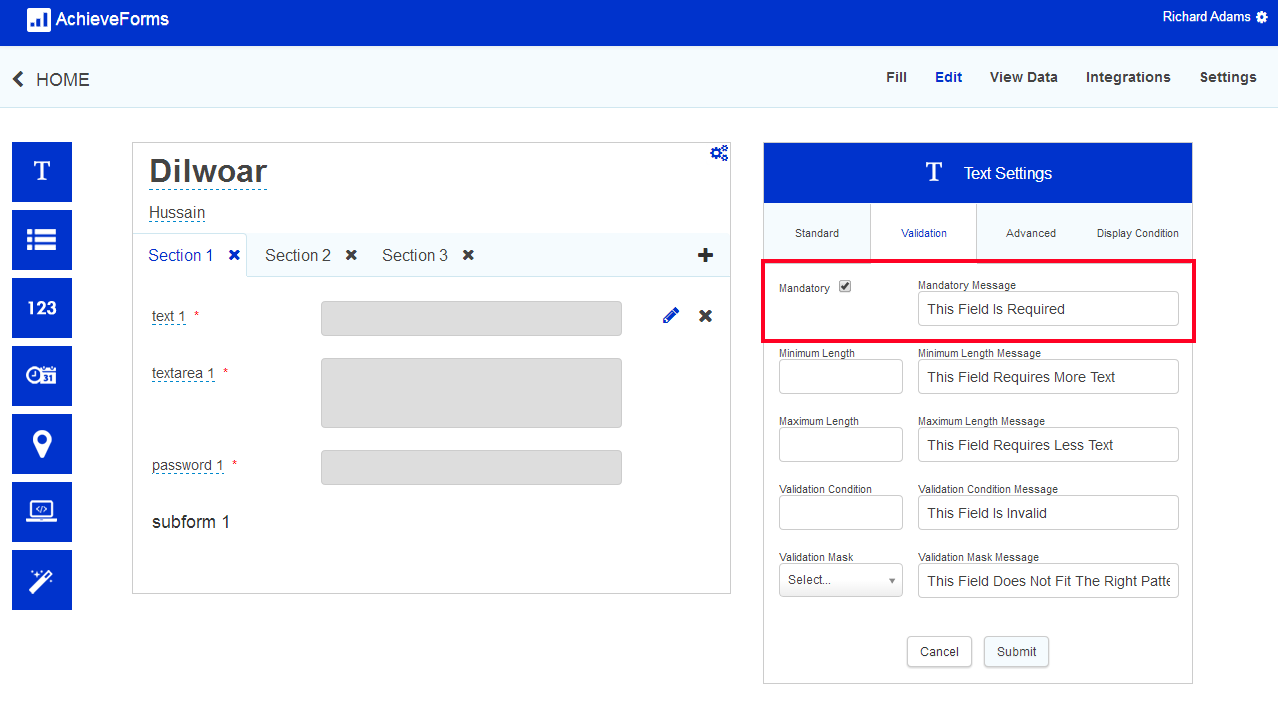
When designing a form, fields will automatically be made mandatory. If this needs to be changed, the form designer can access the settings for that field, click on the 'Validaton' tab and there they can select or deselect the mandatory check box. Form designers can also set a 'Mandatory message' here. This is the message that will be presented to the form filler if they try to progress past the field without filling it in. This will default to a generic 'This field is required' message, however it is good practice to change this to something appropriate for the field the customer is filling in. Note: the default mandatory message cannot be changed. (When designing a form it is considered good practice to only request information that is required - hence all fields by default being mandatory)
Mandatory Conditions
It is possible to set a condition on a field to make it mandatory based on the content of other fields. The conditions are defined in the "Other Conditions tab".
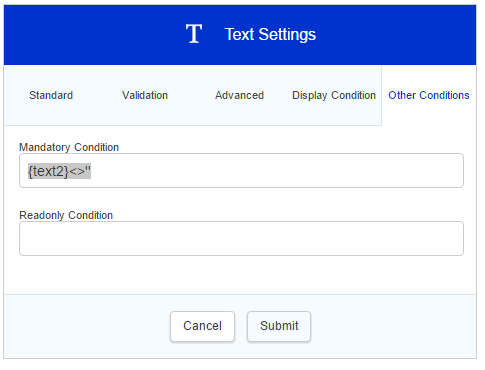
"Other Mandatory" conditions can only check fields on the same section, as it would be confusing and poor UX for users to be sent backwards through the form.
If you are using a mandatory condition, ensure the mandatory tick box is unticked.
Read only Conditions
The other conditions tab also allows a condition to be applied on a field which will allow read only status to be applied based on content of other fields.
Validation Masks
Validation Masks are a way of ‘pattern matching’ the input of a form filler; this is useful where a field has a known set of input formats, for example an email address which will always have ‘@’ in, and an extension of .com, co.uk, .eu etc.
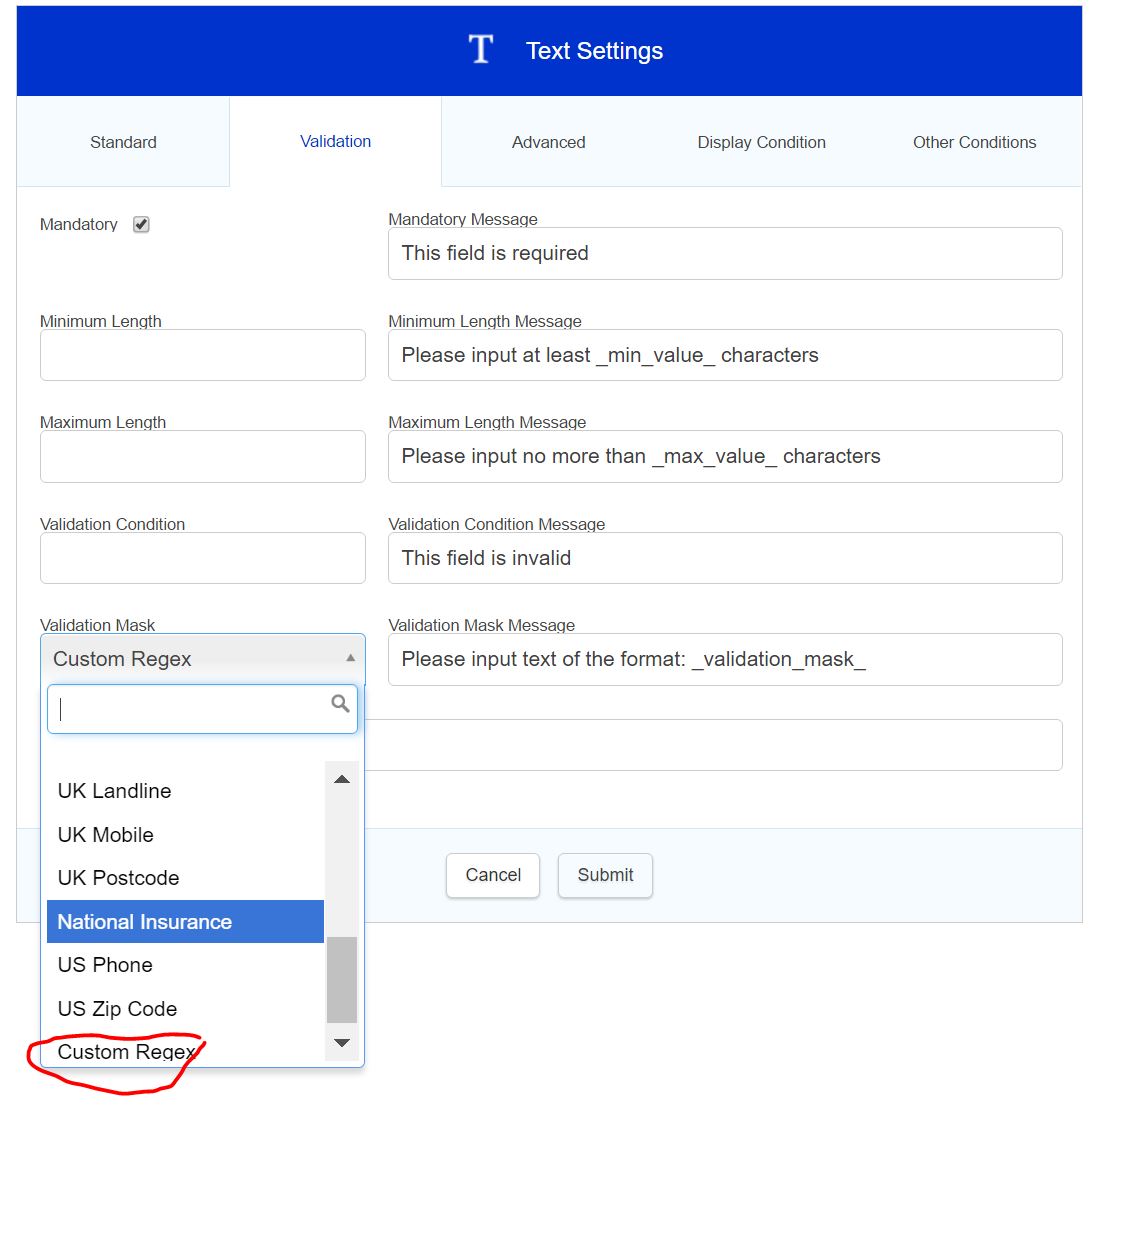
Validation masks are created using Regular Expressions (or regex for short); this is universally used syntax, so many examples are already available to be used simply by searching the internet, including email addresses, phone numbers, National Insurance Numbers etc.Validation masks are added to fields via their properties. Validation Masks can only be added to text or text area field types. Validation masks can also be added to a field on-the-fly, by selecting the 'other' option when selecting a validation mask to apply in the field properties. This stores the validation mask against the field only, so it will not end up in the repository as a results of this action.There are some validation masks already built in to New Forms, however if a new one is required, it can be added to the form by selecting 'Custom Regex' from the 'Validation Mask' drop list in a field's properties.
Please Note: NINo inbuilt validation mask is incorrect. Please use custom regex instead. Related information is found here.
For anyone looking to create their own custom Regular expressions The syntax used for regular expressions is the boost per style.
E.g to validate or invalidate fields for alphanumeric characters you would need to use the synax "^[a-zA-Z0-9]*$ as the validation.
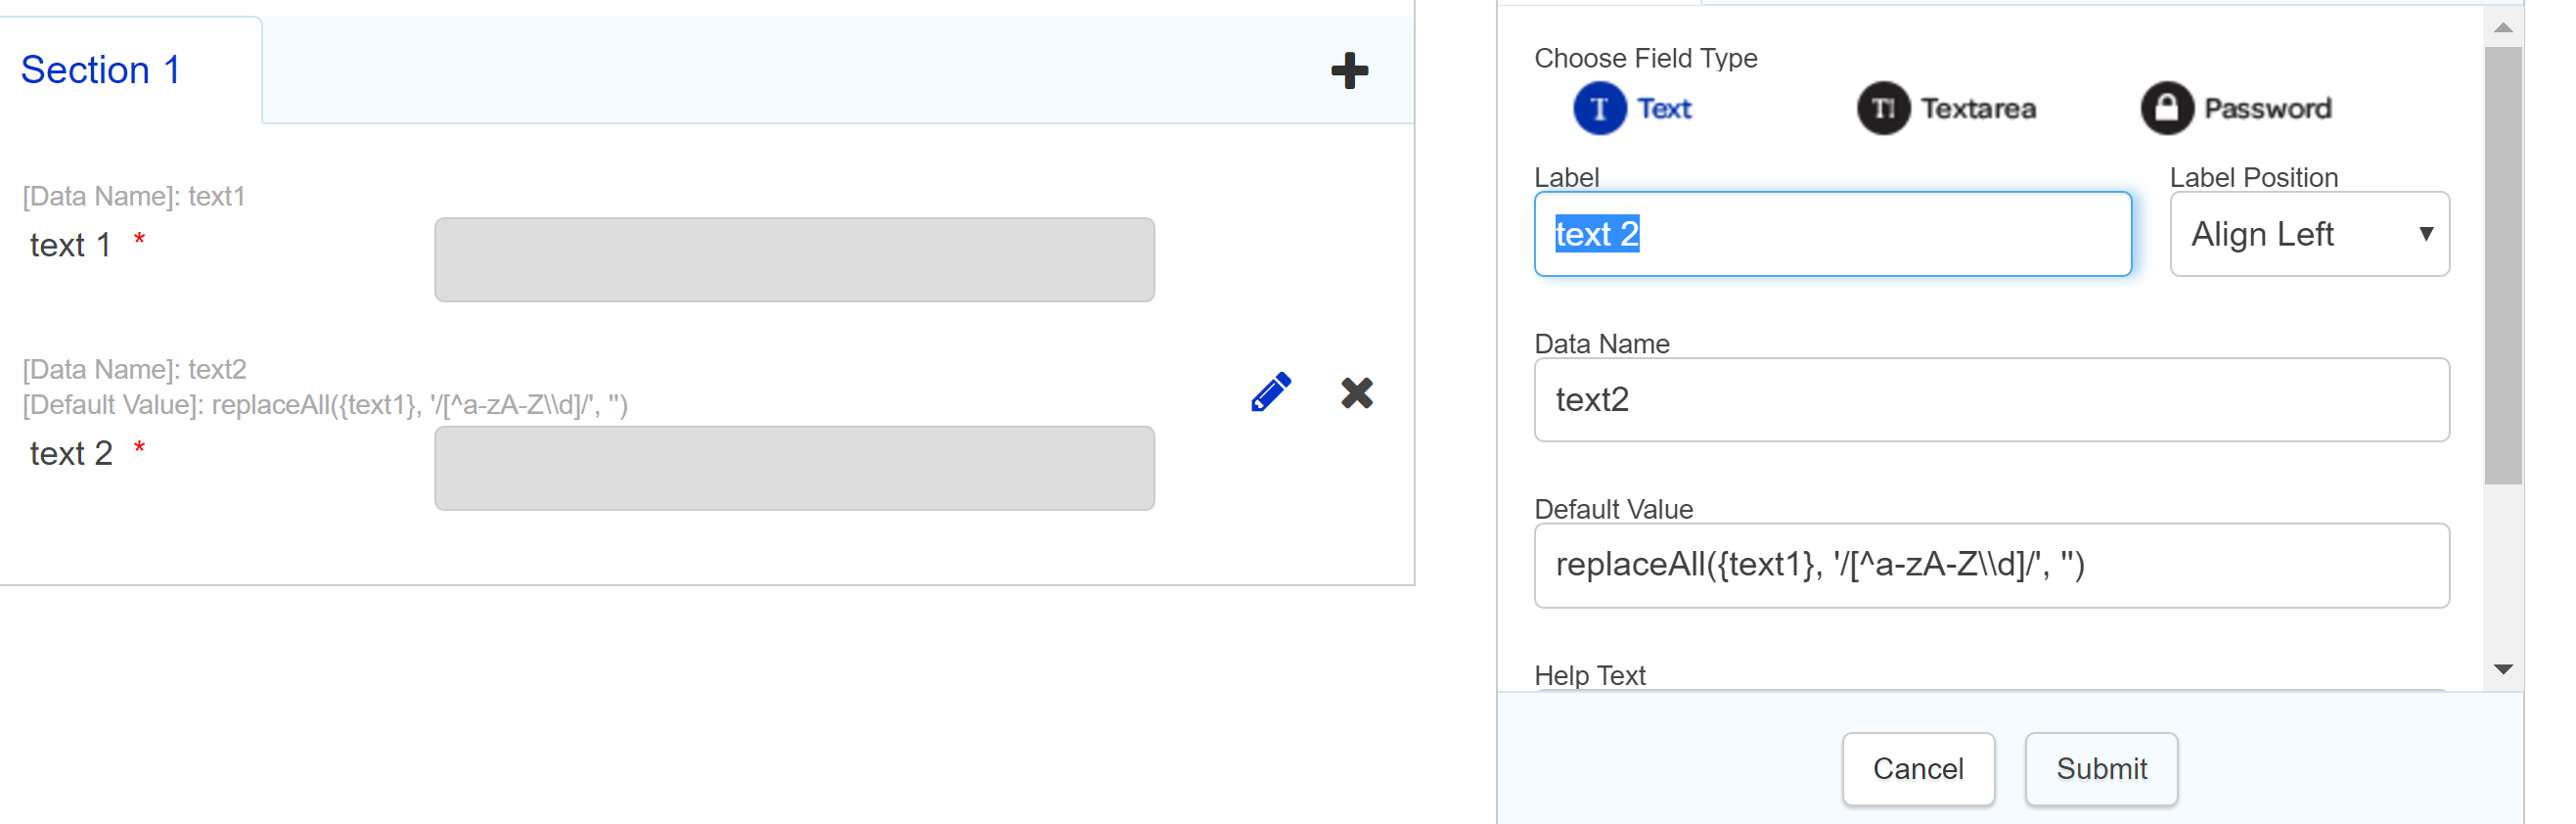
To remove special characters from a field the form filler has filled you can use either of the following syntax.
replaceAll({text1}, '/[^a-zA-Z\\d]/', '')
replaceAll({text1},'[^a-zA-Z ]', '')
As we do not support custom regex, we recommend using the "Regex Coach" utility to prepare new Regular Expressions, and also to search for existing regular expressions for common requirements such as Postcodes and Email addresses - there are many suitable examples that can be found online eg https://regex101.com/
Please note: 0300, 0800 numbers etc do not match the landline validation mask but will only match the UK phones validation. UK landline validation mask only works with geographical numbers.
Validation Conditions
Validation Conditions are rules that can be applied directly to a field. This can be useful for running a validation on a field that compares several results to check that they are valid. For example you may want to check that a form filler has not supplied the same answer in two different select fields. The syntax for this would look like:
{selectfield1} != {selectfield2}
The validation conditions are added in the properties of the field in question (only text and text area support this property), under the Validation tab.
A commonly used validation is to check two entered email addresses are the same for data quality - this can be achieved using
{email}={confirm_email} in the validation condition on the {confirm_email} field
Next to the 'Validation Condition' input box is a 'Validation Condition Message' input box; if any validation conditions are set, this is the message that will be displayed to the form filler if they trigger the validation.
Section Validations
Section validations work a little like validation conditions in that you can use them to validate multiple criteria on a whole section. For example if you want to check that the user hasn't filled in a combination of invalid responses, section validations can be added to any section on the form, including the first section (unlike section conditions).
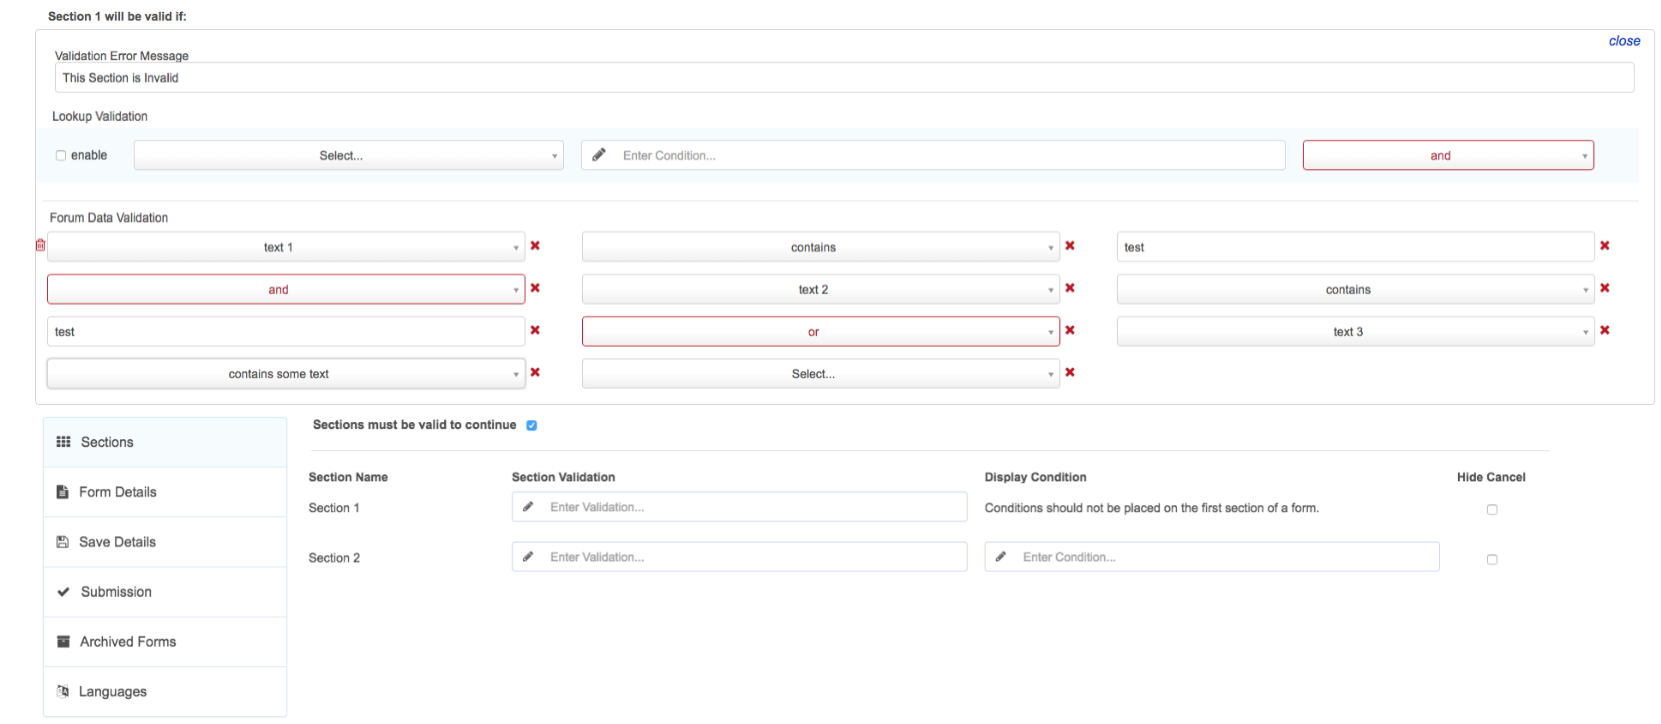
Creating a section validation is almost exactly the same as creating a section condition; navigate to the 'Settings' for the form and go to the 'Sections' navigation on the left. There will then be ' Section Validation' boxes in the centre, one for each section of the form. The validation rule can be pasted in here, written by hand, or by clicking on the pencil icon the rule can be built using the drop down lists (see below).
Note the statement entered defines the condition whereby the section WILL BE VALID
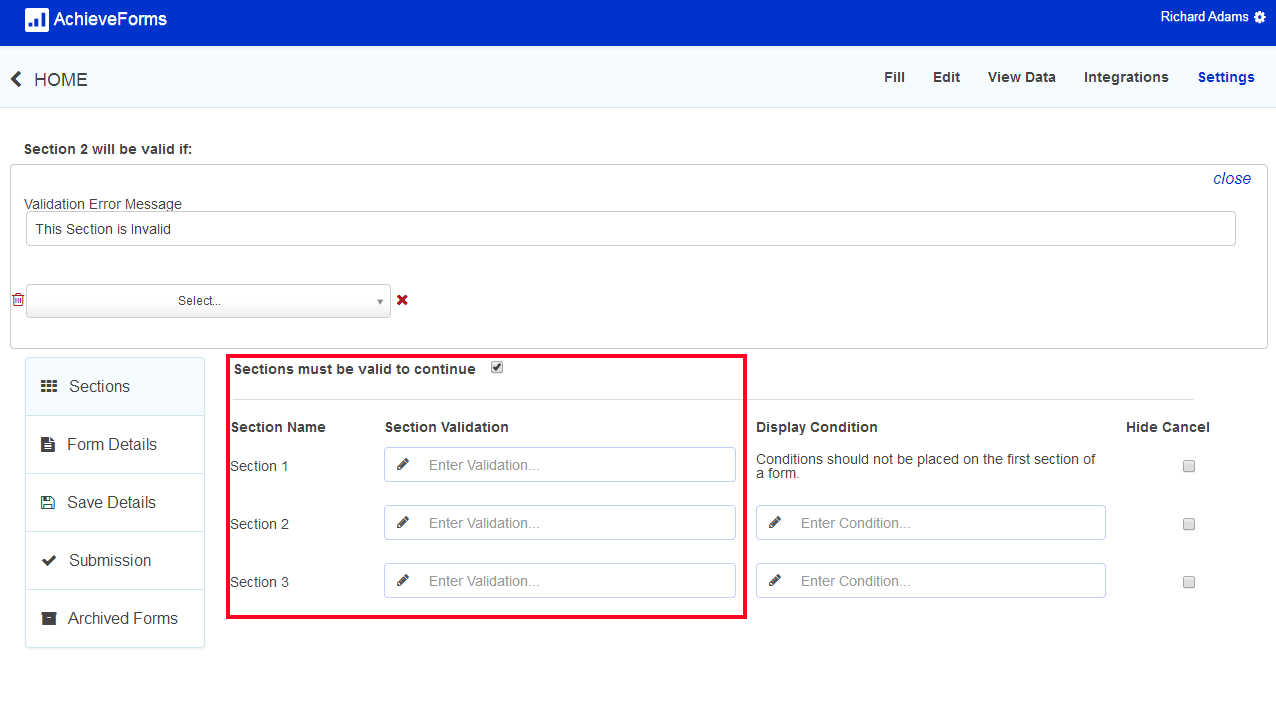
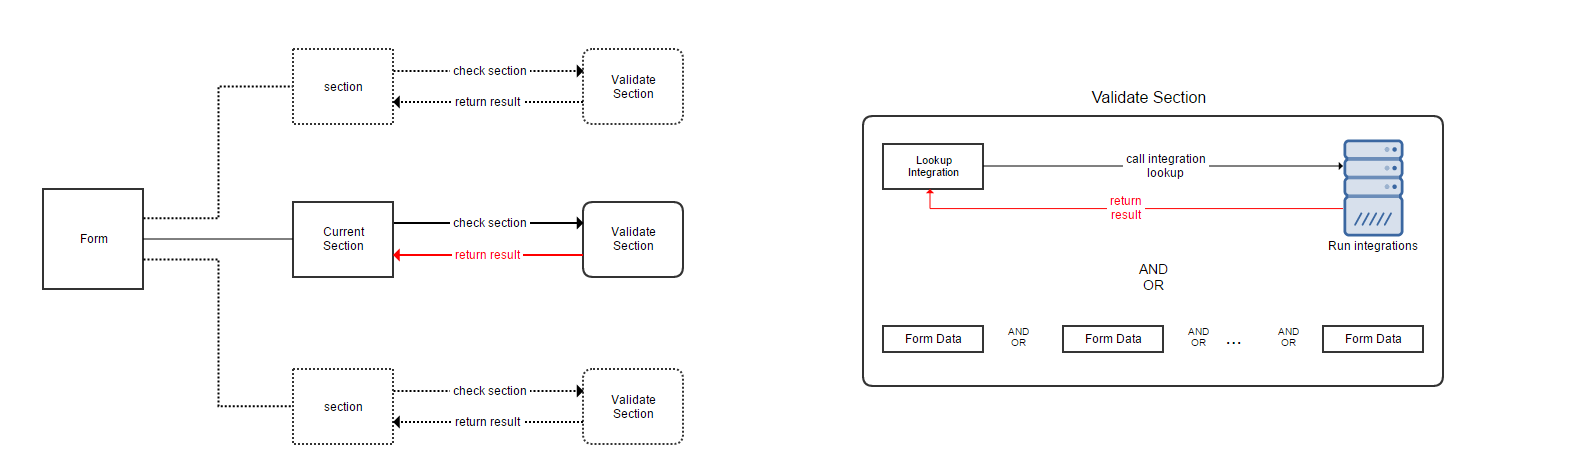
Section validation is used to validate a section:
- A section can be validated using Form Data. E.g. {text2} contains 'test' and/or ...
- A section can be validated using Lookup Calculation. E.g. { _lookup_result } is ''
- A section can be validated using an Integration Lookup and/or Form Data. E.g. r { _lookup_result } is '' and/or {text2} contains 'test' and/or ...
Skipping Sections
Until Release 430, which was released on 4th July 2019, a bug existed whereby entire sections may have been submitted as blank, even if the section contained mandatory fields or conditions. This happened if the user did not visit the relevant section before submitting the form, and was especially common when data within an entire section is pre-populated (i.e. filled in with default values from a previous stage in the process). This was caused by how the form is rendered in a browser: in simple terms, until the section was actually rendered in the browser it did not exist.
Form behaviour is now as follows: all sections of a form, even those not visited by the form-filler, are rendered.This means that default values are prepopulated and submitted.
If you want to make sure the user visits every section regardless, you may wish to add a 'validation' field at the bottom of each of the review sections of you process - i.e. in your process you could add a 'Section reviewed' tickbox at the bottom of the sections for 'Report', 'Location' and 'Contact details' to ensure that these sections are visited each time the form is filled out. You could also add a further calculation to the end of the form to ensure that each section has been ticked off as complete before allowing the user to submit. Section validation conditions could also be added.
Assumptions
- Each section can have the Validate Section using an Integration Lookup AND/OR Form Data
Section Validation Using Lookups
It is possible to validate a section using a lookup instead of a condition. This gives you more flexibility with your validation.
Please note: It is not possible to use a section validation lookup on a section containing a subform.
- Go to Settings section of the form and select the Sections tab.
- Click the pencil icon into the Section Validation field to open the section validation options and add the Integration Lookup AND/OR Form Data validation.
- Lookup should return data with key "result". e.g. if it is database integration then the column name should be 'result'.
Example
- With Database integration:
Database integration returns fields, the fields can be compared in section validation using following syntax. It should return a single row with the column result.
- {result} is {text1}
- {result} contains '2'
The code above is for 'lookup validation' condition text box
2. With HTTP integration:
http://www.anycouncil.gov.uk/findmynearest/home/checkpostcodearea?postcode={CheckPostcode}
CheckPostCode should be on form.
Fields text box in integration manager:
{
"ErrorMessage"
"IsInAnyCouncilshire"
}
Results Page Columns
{
"PostcodeError":"ErrorMessage"
"IsInAnyCouncilshire":"IsInAnyCouncilshire"
}
{IsInAnyCouncilshire} is true
Section Validation - User Experience
A visual indication is shown to citizens when completing forms which have section validation, invalid sections will be indicated by the tab title turning red in contrast to valid sections which will be turned green.

Suggestions for controlling availability of a form for completion where an integration is unavailable
- Mandatory condition doesn't show if using 'icontains' If you use 'icontains' within a mandatory condition the condition will still be followed but the asterisk will not show next to the label. The asterisk however will show if using 'contains' or '='.
- Some validation masks eg sort code - do not work on mobile devices. also if there is a placeholder it won't overwrite the place holder - if the field is mandatory then the form cannot be submitted - only option is to avoid using validation masks
- If using a token in the maximum repeats message for a repeatable subform, the message will leave out every second word of the message.
Sometimes display conditions do not always evaluate correctly. As a result, the fields become hidden via display conditions briefly, clearing the values out. We suggest changing from an ‘is' condition to a 'icontains'. 'icontains' should always be used with select fields rather than is or equals. If you are encountering this issue, please try changing an 'is' condition to an 'icontains’ and then republishing.
- Additionally you can place a condition on the submit button to hide it from the user until all fields have been completed.
Using Validation in Place of ReCaptcha
- Captcha and ReCaptcha codes cannot be used in govService Forms. While these codes can be discouraging to form fillers, they do serve to help avoid or reduce spam in your Form results. In order to reduce spamming, you can utilize the Validation function as follows.
- Create an extra field to the Form. Give it a name that you will clearly recognize as a placeholder (e.g. "youremail").
- Hide the field using CSS. A human form filler cannot see the field, so they will not fill it out.
- You can use validation for that field to prevent any incoming request in which the placeholder field is completed from being submitted.

