Introduction
The services list enables you to list all the online processes and where required to group these into logical groups - to facilitate customer finding the service they require - eg all waste and recycling processes together
Navigate to the Services List through your Self site by going into Self Admin > App Management > Services List. The MYSERVICES_PRECONTENT configuration allows customers to add in content to the Service List page (councilname-self.achieveservice.com/MyServices).
Service Groups
On the first tab - Service Groups - you can manage the service groups. These provide a way to categorise your services because you can 'assign' different services to different service groups.
For example, if you had two service groups on your Self site, one named ‘Apply for’ and the other named ‘Report’, you could put all your services involving applications in the first section and those involving reporting incidents in the latter.
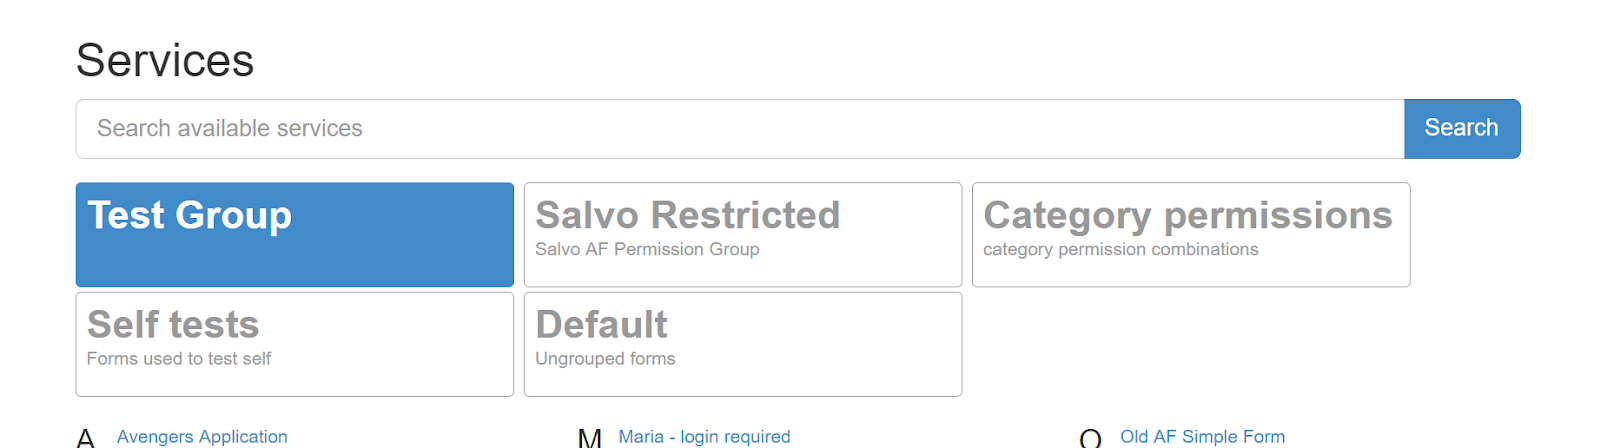
If you would like to use Service Groups, ensure you enable them with the toggle. When enabled, the ‘My Services’ page will display tabs for each group added. You can link to this page directly using yourselfsite/MyServices
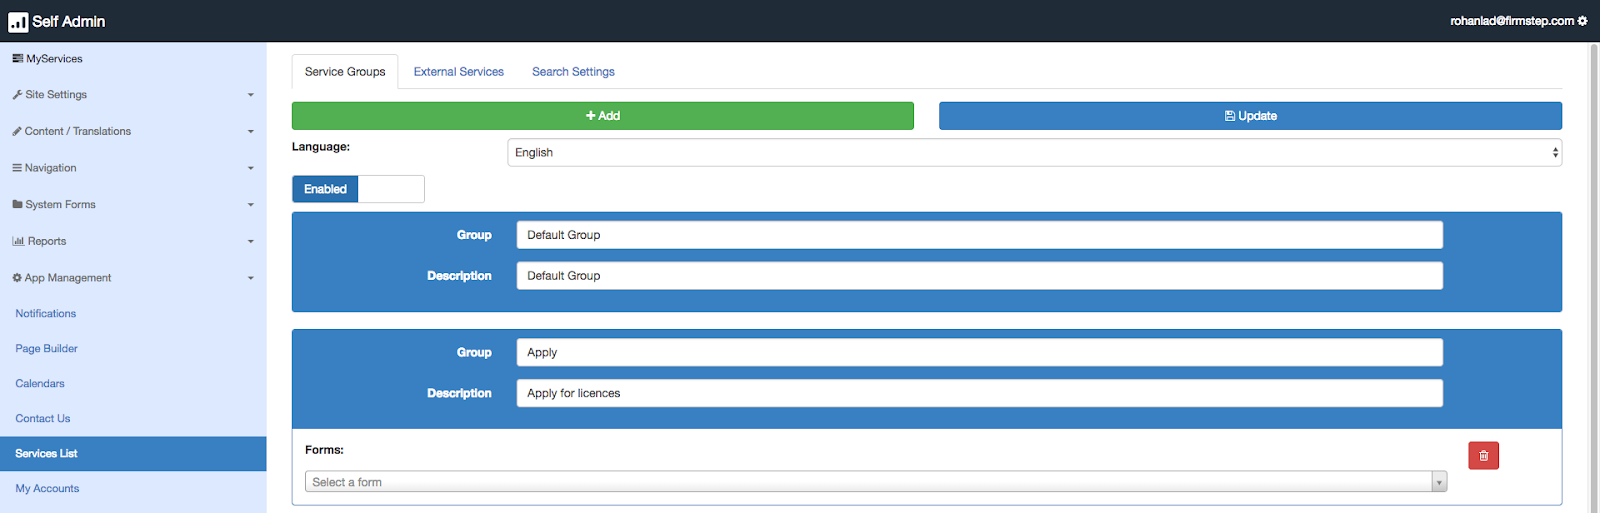
You can name groups and give them descriptions by filling in the relevant text boxes. In the drop down menu underneath each group, you can choose which service to add to that group (so that when you click the group in the ‘My Services’ page, the chosen services which you added will show up).
You may have noticed that the top group does not have a drop down menu to select services. This is because this group is the default group. When this group is selected on the ‘My Services’ page, any service which is not selected in another group will be put in the default group and therefore be displayed. The only way to prevent the default group from being displayed is to make sure every process is in a service group. Basically it will show if you have any processes in categories enabled for the site but not in a Service group.
Any service that is already in a group will be listed above the drop down menu. Clicking the X will remove it from the group. Any service listed in another group will not display in the default group, however, any service can be selected in multiple additional groups.
Click the red trash can to remove a group, and click the green add button at the top to add a new group. And most importantly, don’t forget to click the blue ‘update’ button after having made any changes to this section.
It is potentially possible to add custom js to the footer to force the page to scroll down to the start of the service list once a category has been clicked. Firmstep do not support custom js, but if you wish to add, this can be done at
self admin, content/translations -> page components -> footer site specific value
top of page
External Services
In the second tab - External Services - you can create and manage external services which you may want to make available to your users. These will appear as regular services like the services in your ‘My Services’ page, and in similar fashion can be assigned to any service group. However, these services redirect the user to any URL of your choosing - useful if you would like the user to be redirected to further information on your website.
Click the green ‘Add’ button to create a new external service. Give it a service title (i.e the name of the service that the user will see when they click on it) and provide the URL that you wish the user to be directed to. If you would like this URL to open in a new tab rather than redirect the current page, check the corresponding tick box. To delete an external service, click the red trash can icon. Click the blue ‘Update’ button after making changes.
If the internal service name as created from the process does not reflect the name you wish to expose to the Customers then you can use the External Service option to rename the process appropriately or provide an additional link to the service under another name. This can therefore be used to "rename" the MyServices.
top of page
Search Settings
In the third and final tab - Search Settings - you can configure how users on the Self site can search for specific services. You will initially see a list of all your services - however, you will only see here the services whose categories have been enabled (you can enable categories in the admin console; System Forms>Forms then checking the required box in the ‘Enabled’ category). Self and Dash work independently in the sense that if you access the admin console through Self, and enable a category, all services in that category will show up in the Service List regardless of whether or not the category is enabled in Dash. In similar fashion, if a category is enabled through the admin console on Dash, all processes in that category will show up on the Dash service list, irrespective of whether said category is enabled in Self.
By having ‘Enable Search’ switched to ‘Enabled’, when users are in the ‘My Services’ page, they will be presented with a search bar where they can search for services by typing in the name of the service/synonym:
You can also add search terms to services. If you click on the ‘Search Terms’ box next to a service, you can type text and then press enter. When users type these strings of text you have created in the search bar on the ‘My Services’ page, and press search, the corresponding service(s) will come up. You can add as many search terms to a service as you like. This feature can be very useful, for example, you can assign suitable synonyms to services so that your customers can locate services based on local terminology.
top of page

