Contents
Overview
During the subscription process, users move through pages where they enter their information, select topics, and choose whether to subscribe to network partners. They may also receive several email messages, such as confirmation emails or messages with links needed to complete the final steps of subscribing.
The processes described in this article show when each subscription page and transactional message may appear during the subscriber journey. For detailed information about specific pages or messages, refer to the Subscription Page Templates and Transaction Message Templates articles.
Subscription Signup
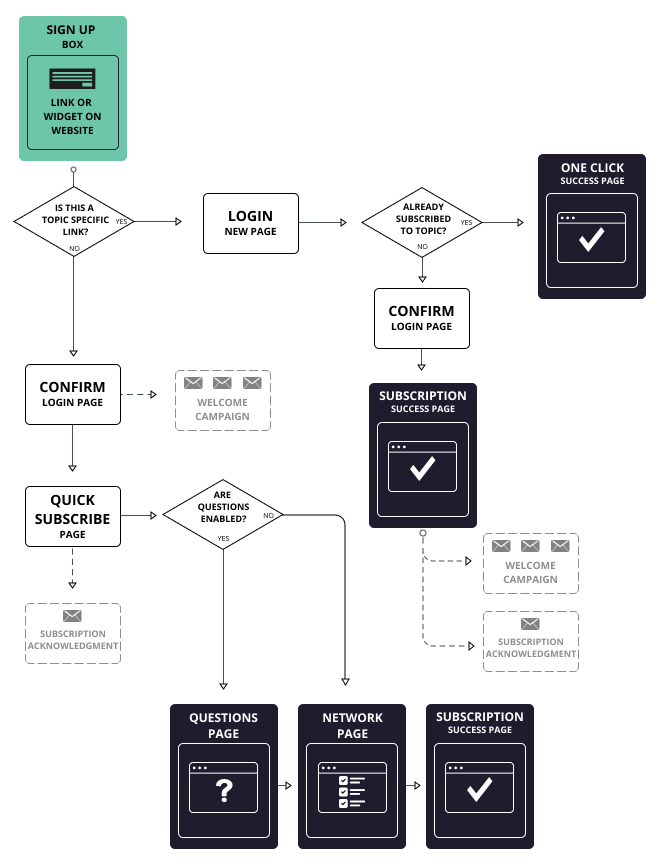
These instructions describe how a new user subscribes after interacting with a signup link or widget on a website.
Step 1: Start the signup process
The new subscriber selects a signup link or interacts with a signup widget on the website.
Step 2: Check link type
The system determines whether the link is tied to a specific topic.
- If the link is topic-specific, the user is directed to a login page.
- If the link is not topic-specific, the user proceeds to a confirmation login page.
Step 3: Login and subscription status check
After the user reaches the login page, the system checks whether the user is already subscribed to the topic.
- If the user is already subscribed, they are taken directly to a one-click success page confirming the subscription.
- If the user is not subscribed, they proceed to a confirmation login page.
Step 4: Confirm and subscribe
From the confirmation login page, the user continues to the subscription process and reaches a subscription success page.
At this stage:
- A welcome campaign may be triggered
- A subscription acknowledgment message may be sent
Step 5: Quick subscribe flow (non-topic-specific links)
If the initial link is not topic-specific, the user follows a different path:
- The user lands on a confirmation login page
- The user is directed to the quick subscribe page
- A subscription acknowledgment message may be triggered
Step 6: Additional questions (if enabled)
The system checks whether additional questions are enabled. If questions are enabled, the user completes a questions page.
- After completing the questions, the user proceeds to a network page (optional step depending on configuration). The process ends at a subscription success page.
- If questions are not enabled, the user may proceed directly to the network page or subscription success page.
Manage Subscriber Account and Preferences
This flow describes how an existing subscriber updates their account, subscriptions, and preferences.
Step 1: Access account management
The process begins when a subscriber selects the Manage Preferences link. This link is typically located in the footer of subscription pages or messages.
Step 2: Log in
The subscriber is directed to a login page to access their account.
Step 3: Open subscriber profile
After logging in, the subscriber is taken to their Subscriber Profile Page, where they can manage subscriptions and preferences.
Step 4: Manage subscriptions
From the profile page, the subscriber can use the Subscriptions tab to make changes.
Remove subscriptions
- Select Subscriptions using checkboxes.
- Remove selected subscriptions.
- A subscription acknowledgment message may be sent.
Add subscriptions
- Select Add subscriptions.
- Quick Subscribe page displays.
- Choose additional topics.
- The process may continue to a Network page (depending on configuration).
- Complete the process until the Subscription Success page displays.
Step 5: Update preferences
The subscriber can use the Preferences tab to modify account settings (such as contact details or subscription settings). A preferences change confirmation message may be sent.
Existing Subscriber Deletes Profile
This flow describes how an existing subscriber deletes their account.
- Accesses the login page. This is usually done through a link in the footer of an email message.
- Log in to the Subscriber Profile page.
- Click Delete My Account.
The system processes the request and displays a Delete Subscription Success page, confirming that the account has been deleted. After deletion, the system may send a confirmation message indicating that the subscriber has been removed.
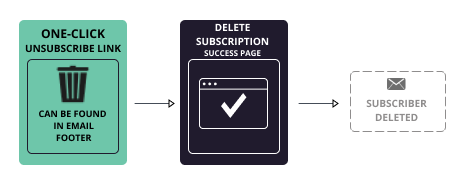
Existing Subscriber Deletes Profile Using One-Click Unsubscribe
This flow describes how an existing subscriber deletes their profile using a one-click unsubscribe link.
- Select the one-click unsubscribe link. This link is typically located in the footer of an email message.
- The system immediately processes the unsubscribe request without requiring login or additional steps.
The Delete Subscription Success page displays, confirming that the unsubscribe action has been completed. After the process is complete, the system may send a notification confirming that the subscriber has been deleted.
Existing Subscriber Password Recovery
This flow describes how an existing subscriber resets their password when it is forgotten.
- Access the login page through a link in the footer of an email message.
- Enter login credentials.
- Start password recovery from the Password Required page.
- Select the option Recover password and Password Recovery page displays.
- Submit password reset request.
- Enters the email or account information.
- The system sends a password reset email with instructions or a secure link.
- Follow the instructions from the email and the password reset page.
- Create and confirm a new password.
The system updates the account credentials, and it may send a password reset confirmation message.
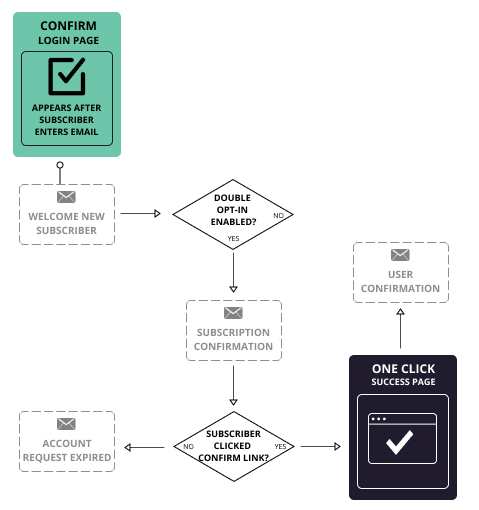
Double Opt-In Subscriber Confirmation
This flow describes how a subscriber is confirmed when double opt-in is enabled.
- Enter email address on a subscription form.
- Check if double opt-in is enabled. The system determines whether double opt-in is required.
- If double opt-in is not enabled, the user may proceed directly to standard onboarding or confirmation messaging.
- If double opt-in is enabled, the system continues with the confirmation process.
- Open the subscription confirmation email. This message includes a confirmation link that you must click to complete the subscription.
- The One-Click Success page displays confirming the subscription.
Note: If the subscriber does not click the confirmation link, the request will eventually expire and the subscriber must restart the subscription process. By default, subscribers have 7 days to click the confirmation link and complete the process. This time limit can be configured in Account Options by Account Administrators.