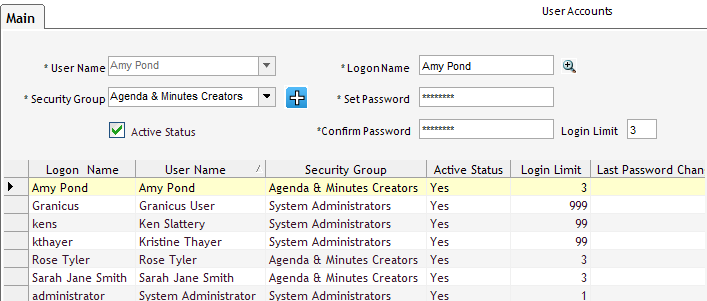
- From the left menu, click System Security, then User Accounts. The User Accounts screen is displayed. This screen displays a list of all existing users, regardless of their security groups; this is useful when you want to find a specific user but you don’t know his or her security group.

- Click New. The following fields are displayed:

- Complete the following fields and checkboxes (fields with asterisks are required):
| Item | Description |
|
*User Name
|
Select a user name from the drop-down list provided.
Use the People section to set up the person records that will be available in this field.
It’s possible to create a new person record from the User Accounts screen as follows:
- Click the plus sign beside the field, then click New, and add the new record.
- Click Save, then click Go Back. The new record is now available in the drop-down list.
|
|
*Security Group
|
Select a security group from the drop-down list provided. This is the group through which the user gains his or her access rights to the system.
Use the Security Features section to set up the security groups that will be available in this field. You can create a new security group from the User Accounts screen as follows:
- Click the plus sign beside the field, then click New, and add the new record.
- Click Save, then click Go Back. The new record is now available in the drop-down list.
|
|
Active Status
|
This checkbox is selected by default. Deselect the checkbox only if you want to de-activate a user who no longer needs access to the system. After you deactivate the user here, you should clear the Active checkbox for their Person record on the People screen (Main tab).
Note: To display all users, whether Active or Inactive status, click the Tools menu and clear the Show Active Users Only menu item.
|
| Last Password Change | This field stores a log of the date when you last changed that user's password. This is an informational field only, but it can help you keep track of how often you are changing user passwords. |
|
*Logon Name
|
Enter a logon name for the user. This is the name the user will use to sign in to the system.
|
|
*Set Password
|
For new accounts, the password is automatically set by default. Please check with your Legistar Admin for the default password. When a user logs on for the first time, he or she should change this password. If your database has Password Policy enabled, passwords must have a minimum of twelve characters and contain at least one uppercase letter, one lowercase letter, one number, and one special character; if Password Policy is disabled, passwords have a maximum of twelve characters. The system displays the date of this password change on the User Accounts screen.
|
|
*Confirm Password
|
Make sure to enter the same password entered in the Set Password field.
|
|
Login Limit
|
Set a login limit for each user. This is the number of times the same user can be logged into the system concurrently (e.g., on a computer at home and in the office). This is turned off by default.
|
- Click Save.
Note: System administrators can see a list of users currently logged on by clicking the Tools menu and selecting Currently Logged On.


