This feature is part of the govDelivery Advanced Package. If your organization is interested in accessing this advanced feature, submit a request or contact your Customer Success Consultant.
When a subscriber first signs up for one or more topics, they will receive a few transactional emails, such as the Welcome New Subscriber and Subscription Acknowledgement transactional messages. Since these transactional messages are only sent to subscribers who subscribe themselves, uploaded subscribers will not be included in the Welcome Campaign. Depending on the message frequency for their selected topics and the day of the week on which they signed up, they might not receive another email from your organization for days or even weeks.
We recommend engaging new subscribers with a Welcome Campaign, a series of messages designed to better acquaint them with your organization, mission, and content.

Our prepared Welcome New Subscribers Campaign provides a straightforward approach to this tactic. By enabling the campaign for your account, the system will automatically reach out to new subscribers at intervals throughout their subscriber journey as defined by you, letting your organization foster the relationship with each new subscriber, automatically tailoring the timing of your communications to each individual.
Note: You must have the Account Administrator role in order to edit and run the Welcome Campaign.
How it Works
The Welcome Campaign runs across all topics in your account.
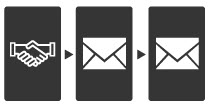
The process for working with the campaign looks like this:
Configure the Welcome Campaign
By default, the Welcome Campaign contains three standard messages. These messages welcome subscribers, encourage them to visit your website, and tell them how to edit their subscriber settings. An Account Administrator can activate the Welcome Campaign without making any changes, keeping all campaign defaults to quickly start using this feature.
The Account Administrator can also customize the campaign by
- Editing the subject line and body of the default messages
- Adding or removing messages from the sequence
- Adjusting the timing between each message
Activate the Campaign
Account Administrators can activate a Welcome Campaign by selecting 'Welcome Campaign' when creating a new campaign. This suppresses the standard 'Welcome New Subscriber' transaction message, ensuring that subscribers do not receive too many onboarding emails at the outset of their subscription.
The Subscriber Experience
Any subscriber who signs up for their first topic for your organization (thereby creating a new subscriber account) after the campaign has been activated will receive the first message in the Welcome Campaign. When they receive the first message, the system schedules the next message for that subscriber, based on the timing between messages in the Welcome Campaign settings. If the campaign contains only one message, no additional messages are scheduled.
When the next message goes out, the system schedules the next message for that subscriber, and so on until there are no subsequent messages in the campaign.
Review Engagement and Adjust
When the Welcome Campaign is activated, it begins collecting engagement data (opens and clicks). You can use this data to test the content and timing of your messages, optimizing them for maximum impact.
You can also de-activate specific messages in the campaign while you edit them, then re-activate them. You cannot de-activate the entire Welcome Campaign. This ensures that your new subscribers will continue to receive welcome messages. If you would like to return to the default transactional welcome message, set up the Welcome Campaign with only one message.
The New Subscriber Sign-Up Flow
When the Welcome Campaign is activated, it replaces the standard Welcome New Subscriber message.
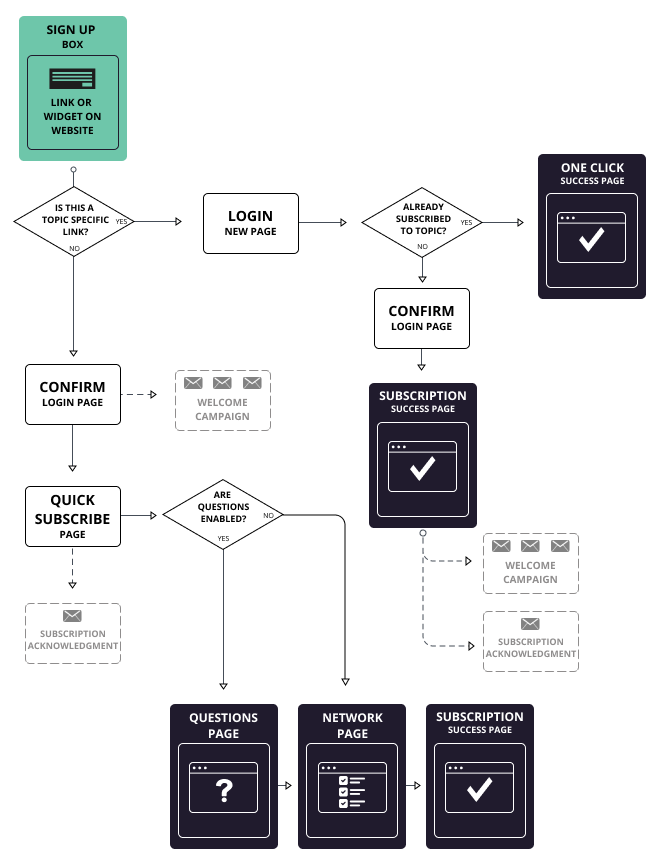
The adjusted new subscriber experience looks like this:

You can find more information about the other pages and messages a subscriber will see when first signing up for email updates in the Subscription Process Pages and Messages article.
If Double Opt-In is Enabled
Using the Welcome Campaign with the double opt-in feature makes it easy to reach your pending subscriber base more than once before their pending profile expires. If double opt-in is enabled for your organization, each welcome campaign message will include special text that appears for any subscriber who has not yet confirmed their profile:
- The subject of the Welcome Campaign message will start with the text "Please Confirm Your Email".
- The body of the message will contain the following text at the top:
Please confirm your email address to receive future messages from [Your Organization Name].
Unconfirmed accounts will be deleted automatically.
- The message will also contain a link that allows these subscribers to confirm their accounts.
Notes:
- If a Welcome Campaign is active in the account, subscribers will still receive messages in the campaign, even if they do not confirm their subscription. However, each message in the campaign will include a widget with a link asking them to confirm their email.
- With double opt-in, a subscriber's profile will expire if they do not confirm in a given time period. If that time period lapses before sequential welcome campaign messages are set to send -- For example, if you set up the Welcome Campaign to send a message 7 days after a subscriber signs up, but pending profiles expire after 5 days -- then unconfirmed subscribers will not receive the follow-up messages.
- If the subscriber's profile expires, they will receive the usual Account Request Expired message (you can learn about this message in the Transaction Messages article).
Accessing the Welcome Campaign
- Click Campaigns.
- Click Welcome.
Get Going Fast
We've created three default messages with timed intervals. You can activate the campaign without making any changes to quickly get going. If you choose this approach, go to the Activating the Welcome Campaign section.
You can also customize Welcome Campaigns using information in the following sections of this article.
Customizing the Welcome Campaign Settings
You can customize the Welcome Campaign settings in the Welcome New Subscribers section. These customizations will apply to all Welcome Campaign messages. Customize by clicking the Edit buttons (indicated by pencil icons).
- The From address is the name and email address that your messages are sent from. It identifies to subscribers who is sending the email.
- The Banner is the image that will appear at the top of every message in the campaign.
- The Footer contains standard text and/or graphics (like your logo) with functional links for editing subscriber settings.
Note: There may not be multiple from addresses, banners, or footers to choose from if you or another Account Administrator haven't created more than one for your organization.
Editing and Adding Messages
You can customize the default messages included in the campaign to meet the needs of your organization, you can also add to the message sequence, including as many as 10 messages.
Activating, Deactivating, and Removing Messages
You can activate or deactivate individual messages within the Welcome campaign, allowing you to retain message content that you're working on without preventing you from running the campaign. The campaign requires at least one message, so you cannot deactivate or remove the first message in the sequence.
To activate or deactivate a message:
- Click the Edit
 button.
 - Set the Ready toggle to:
- Yes to activate the message. The toggle's slider will be on the right side.
- No to deactivate the message. The slider will be on the left side and the toggle will be grayed out.
Notes:
- After the campaign is activated, the Ready toggle will read Send in the campaign message editor.
- When a message is deactivated, subscribers will not receive that message and will be sent the next active message in the sequence instead. After the message is reactivated, it will be sent to any new subscribers going forward, but subscribers who missed it will not receive it retroactively.
- Click Save.
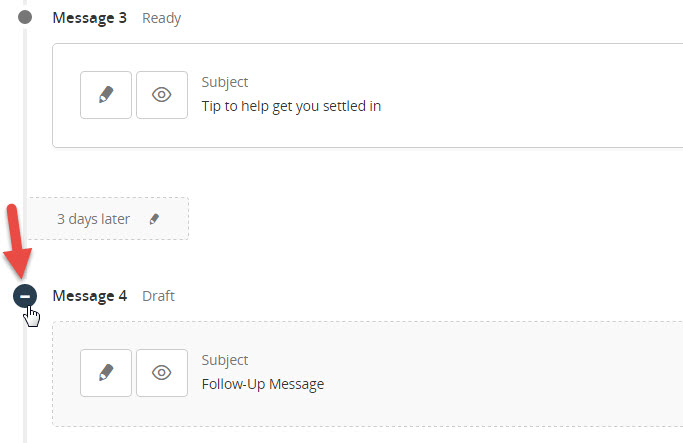
To remove a message: Click the remove button  .
.

Notes:
- When you remove a message, it both deactivates the message and removes it from the message sequence.
- You can only remove messages in reverse chronological order. This ensures the proper sequence of messages stays intact.
- When you remove a message, you are not deleting the message. Message content and any engagement metrics collected for that message (if the campaign was already activated) are saved.
- Any removed messages can be added back in using the Add Message button. When you add back a message, message content and engagement metrics become available again.
Activating the Welcome Campaign
- Review all messages, using the Preview Message
 button.
 - Make sure all messages you want included in the campaign are activated.
- Click Activate at the top of the page.
Monitoring the Welcome Campaign
When the Welcome Campaign is activated, it starts to collect metrics about each message. This information is displayed to the right of each message in the Message Sequence section, and includes:
- Sent: The number of recipients who have successfully received the message.
- Opened: The average percent of recipients who opened the message.
- Clicked: The average percent of recipients who clicked at least one link in a message.
Frequently Asked Questions
Q. What if I want to deactivate the Welcome Campaign?
A. You cannot deactivate the Welcome Campaign after turning it on, but you can deactivate individual campaign messages. If you deactivate all but the first campaign message, the campaign will function like the standard "Welcome New Subscriber" transaction message. If you determine that deactivating the campaign is absolutely necessary, contact our Customer Support team by clicking the 'Contact Support' button on the right side of this page, and we will work with you.
Q. If I deactivate a campaign message before a subscriber is scheduled to receive it and reactivate it later, does the subscriber get sent the message late?
A. If a subscriber is scheduled to receive another message in the Welcome campaign sequence, they will receive the next active message. For example, if a subscriber receives message #1 and message #2 is inactive when they are scheduled to receive the next message, they will receive message #3 instead. If there is another message after message #3, the campaign will use the timing for message #3 to schedule the next message for the subscriber.
If no subsequent active messages exist when the subscriber is scheduled to receive the next message in the sequence, they will not receive any messages.
Q. How do I change the order of messages in my sequence?
A. You can deactivate a message to skip to the next message in the sequence. If you want to move a message so it is used later in the sequence, deactivate that message and copy its content to a later message in the sequence.


