This feature is part of the govDelivery Advanced Package. If your organization is interested in accessing this advanced feature, submit a request or contact your Customer Success Consultant.
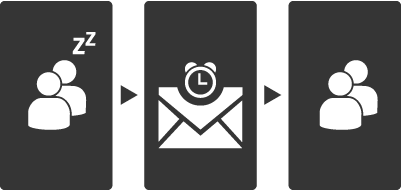
It's natural for your subscribers to drop off in engagement over time. Sometimes a subscriber becomes less responsive because they're no longer a good fit for your content: maybe they've moved out of the area, changed jobs, or abandoned their email address. But many times, they just need to be reminded of why they subscribed to your content in the first place.

govDelivery makes the process of reaching out to and re-engaging inactive subscribers as easy as possible. After making a few simple tweaks, you can set up our prepared re-engagement campaign to automatically reach out to subscribers when they fall dormant.
How it Works
The re-engagement campaign is designed to put some of your most popular, high performing topics in front of your subscribers. These subscribers indicated interest in your content at one point; perhaps their interests have shifted slightly and they might find another topic more useful. The process is simple:
You choose your audience
You can select which topics to target for your audience. You'll also define what "inactive" means to you, by using simple criteria options to set the length of time that must have elapsed since the subscribers last opened or clicked an email.
You create the email
The re-engagement campaign uses a bulletin template with a default message, but you can change the text or add more to suit your needs. You will also select the topics that you want to suggest to these subscribers.
You configure the landing page
When subscribers click on one of your suggested topics in the re-engagement email, they will be taken to a landing page where they can sign up. You can configure this sign-up page, adding specific messaging and inserting a particular banner image.
You determine if the campaign is recurring
After reviewing everything, you choose whether the email is sent once or if it is sent monthly. If you make this email recurring, then the campaign will check your subscriber base on the same day each month to find all subscribers who match the "inactive" criteria you set. These subscribers will receive the re-engagement email. You will be able to pause or turn off the campaign at any time.
With a well-timed, well-aimed automated re-engagement campaign, you can appeal to subscribers before they go cold. In addition to keeping your subscriber base active, this method also comes in handy when you want to delete an old topic. By letting subscribers opt into a newer topic subscription, you can ensure they continue to receive updates relevant to them.
The Re-Engagement Sign-Up Flow
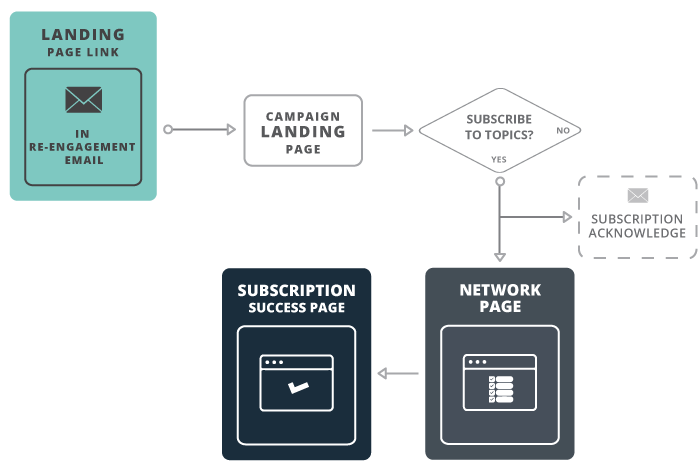
When a subscriber receives the re-engagement email and clicks on a topic to subscribe, they will be taken to the landing page you configured as part of the campaign. Following that landing page, they will see the Network page, and lastly the Success page. These pages are managed in your Subscription Page Templates.

Note that if the Network page has not been set up for your account, it will be bypassed.
To Create a Re-Engagement Campaign
- In the left navigation, click Campaigns.
- Click Create Campaign.
- Click Create Re-engagement Campaign.
- Give your campaign a Name.
To Select your Campaign Audience
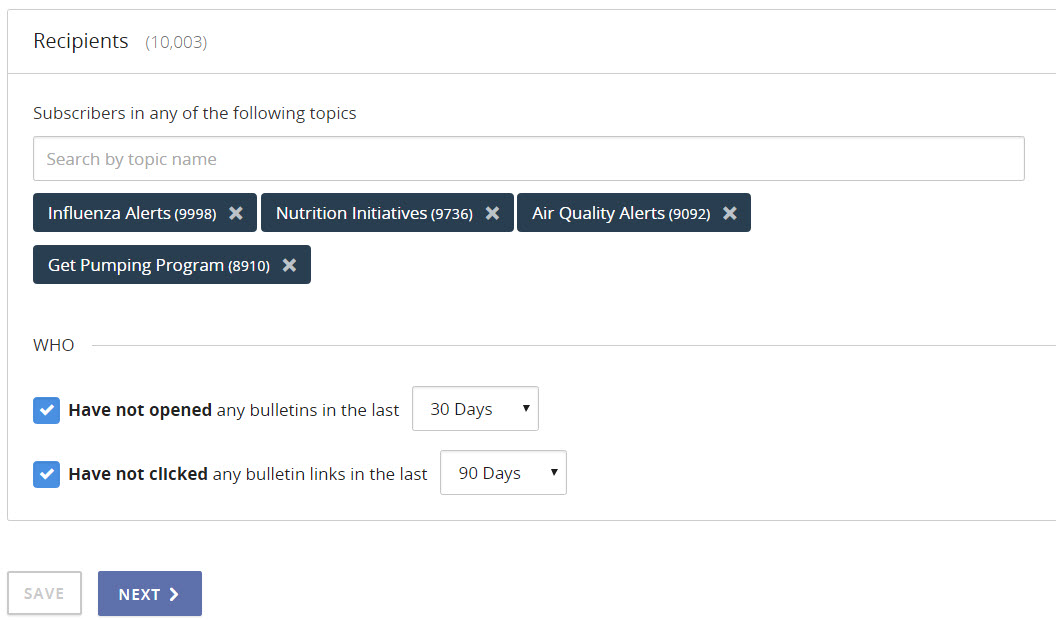
- Under Recipients, use the type-ahead box to include subscribers from one or more topics in the recipient list of your campaign message.
Tip: If you have trouble remembering any topic names or codes, right-click on the Topics item in the left navigation and open your Topics list in a new tab
- Use the drop-down menus below to choose how many days should pass since a subscriber opened or clicked on a message before they are considered "inactive" and included in this campaign.
Tips:
- In determining your inactivity criteria, it's helpful to consider the frequency of your communications. If your topic(s) have less frequent bulletins, expect subscribers to go longer between opening and clicking.
- Keep in mind that these criteria boxes are connected with OR logic, meaning that a subscriber will receive the re-engagement message if they meet ANY of this criteria.
- If you do not want to use either inactivity filter setting, clear the blue check box next to it.
- When you are finished, click Save and Next.
As you select topics and add criteria, you'll notice the Recipients count changing to reflect the number of subscribers who currently meet all requirements. Keep in mind this recipient count only applies to this moment. If you save your campaign and choose to run it later, the recipients count may be different.

When a re-engagement campaign is run, any subscribers who meet the criteria at that time will receive the re-engagement message.
To Create the Campaign Email Message
- Select a From address. If there are not multiple From Addresses set up, you may be unable to edit this field.
- Optionally change the Subject line. As a best practice, try to keep your subject line to 8 words or less.
- Select the Banner you want to use for this email. A banner is an image at the top of your message.
Tip: You can find information about uploading new images in the
Banner Images article. Only users with the Account Administrator role can upload banner images for use within your account.
- Boilerplate text is provided by the campaign for the Body of your email message. Make changes to this content as you see fit. Learn more about editing bulletins.
Tips:
- As you create your email, you can click the Preview button to see both an HTML and plain-text rendering of the message.
- It's worth noting that the re-engagement campaign does not exclude newer subscribers who have never opened or clicked an email. For this reason, we recommend keeping your message neutral, and not including messaging like, "It's been a while since we heard from you!"
- The boilerplate text uses the Email Address Macro. You can use other macros in your message to personalize it. For more information, see Macros.
- Choose your Featured Topics using the type-ahead box. As a best practice, recommend your most popular topics. You should also make sure that these topics are relevant to the selected audience.
- If multiple footers have been created for your account and you have the appropriate permissions, you can select a different footer from the drop-down Select Footer menu. You can also make changes to the selected Footer.
- Click Save and Next.
To Configure your Subscriber Landing Page
- Select the Banner image you want to use at the top of the subscription page.
Tip: You can find information about uploading new images in the
Banner Images article. Only users with the Account Administrator role can upload banner images for use within your account.
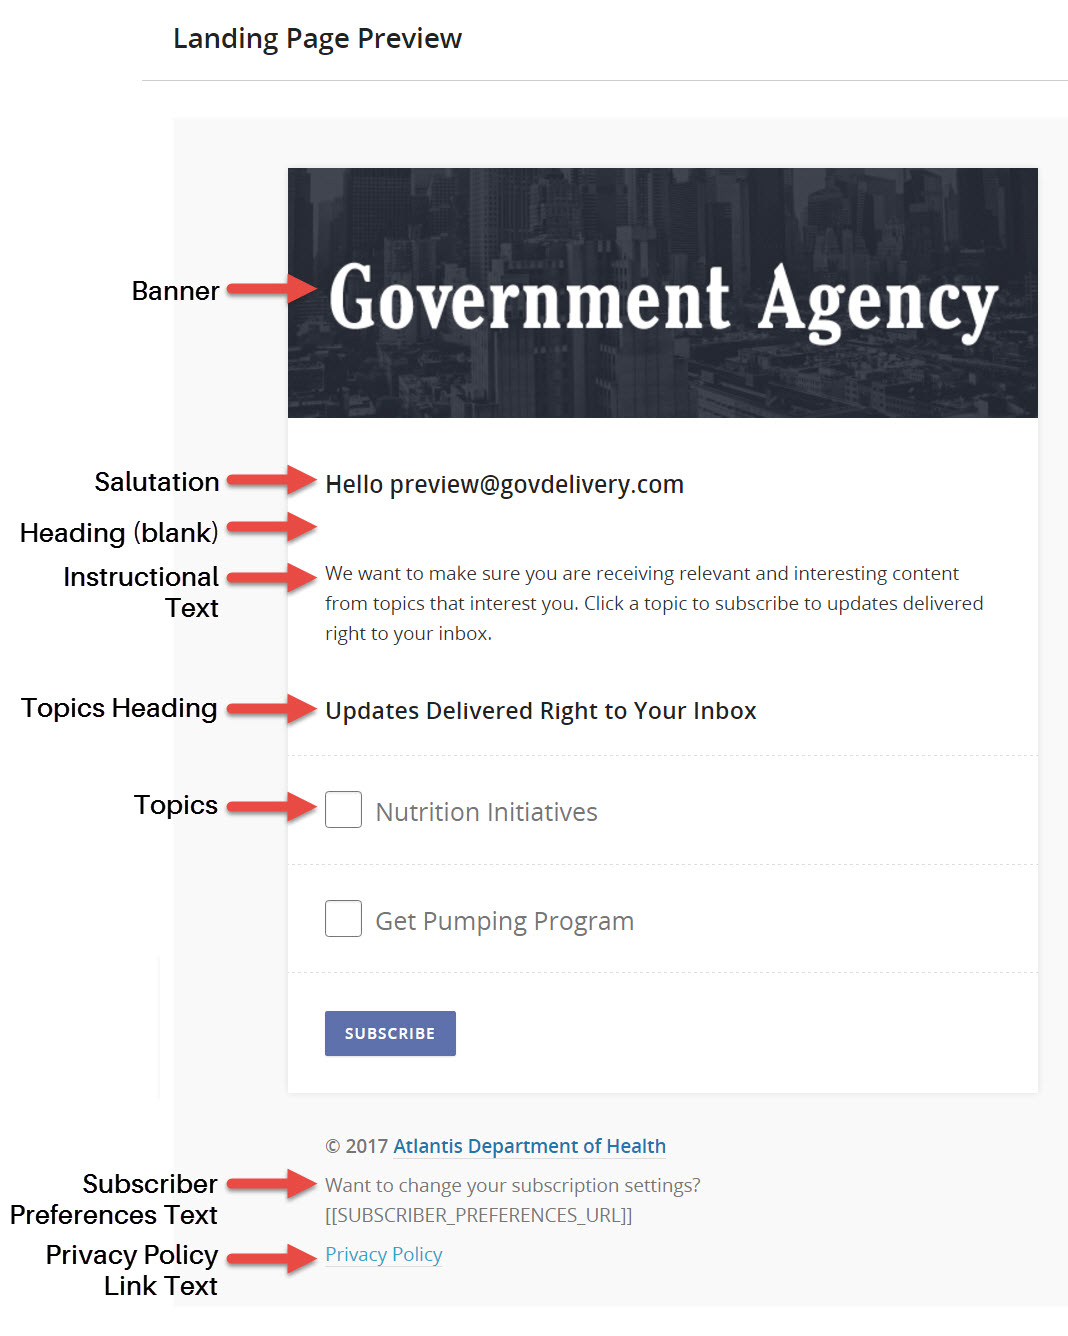
- Use the next fields to enter text for the elements of the landing page. You will find default text for some elements.
Tips:
- Any element you leave blank will not be included in the page.
- Learn more about editing bulletins.
- You can use macros in your landing page to personalize it. For more information, see the Macros.
- Click Preview to see a rendering of the landing page.

- Enter text for the privacy policy link if you want it to say something other than "Privacy Policy." This link uses the URL for your privacy policy that your Account Administrator provided to Granicus.
- Click Save and Next.
To Kick Off your Re-Engagement Campaign
- In the Review section, look through your campaign details.
- Give your email and landing page one last pass-through by clicking the corresponding preview button.
- Make any changes to your campaign by clicking the appropriate Edit button.
- Choose a Sending Option.
- Select One-Time Send if you want to manually send the campaign email only once.
- Select Recurring Campaign if you want the campaign email sent monthly, then use the resulting fields to choose the week, day, and time.
Notes:
- When you activate this campaign, the campaign email will not be sent until the day you selected occurs. If the day you selected already passed for the current month, the first campaign email will be sent next month.
- If a month does not contain a day that matches your settings, no email is sent that month. This might happen, for example, if you chose the fourth Friday of every month, and a month has only three Fridays.
- Click the Send Now button if this is a one-time email or click Activate if this is a recurring campaign.
You will see a summary page with details about the campaign you just created. If this is a recurring campaign, you can see the next scheduled send on this page.
Managing Existing Campaigns
You can see all campaigns for your account by clicking Campaigns in the left navigation menu. From this list, you can see details about a campaign by clicking the link in the Name column.
- To quickly find campaigns, use the filter fields above the list to search by keywords or status. Statuses include:
- Draft: Campaigns that have not been sent or scheduled
- Sent: Previously sent one-time campaigns
- Active: Recurring campaigns that are currently running
- Paused: Recurring campaigns that are currently inactive
- To make changes to a recurring campaign, pause it. Any changes you make will be applied going forward once you re-activate the campaign.
- To delete a campaign, select the check box next to it and click Delete Selected Campaigns.
Frequently Asked Questions
Q. What happens if a subscriber has a password set on their account and they choose to add a subscription using the re-engagement email?
A. Subscriber passwords will not be required to add subscriptions. The re-engagement sign-up flow bypasses the subscriber sign-in page, making it as easy as possible to subscribe to new content updates.
Q. Can I change the default template for the re-engagement email and landing page?
A. Administrators can change the text of the re-engagement email and landing page when they create a campaign. If you want to add standard default text for your account, a user with the Account Administrator role can access these templates by clicking Templates in the left navigation menu, and then clicking either Campaign Email or Campaign Landing Page in the right-hand menu.


