This article will cover:
This article explains what the People section is and how to add people and users in Peak Agenda. You can either follow the video or written instructions below.
People section
The People section is where you will manage your Peak people, associated users, and their roles/permissions. The People page will display a list of all the people in your system and identify whether they have Peak user accounts. If your jurisdiction has Boards and Commissions, your People list will pull from there (including applicants). It is important for the various departments in your jurisdiction to be aware of that so a person that is not recognized is not unintentionally deleted.
How to add People
To work with people, click Admin in the upper right-hand corner. Choose People & Groups from the menu on the left, then select People and Users. The People page will load by default with the People tab selected at the top of the screen. Note: Only users with the Peak Admin role (or a platform administrator) will have access to the Admin portion of the application. For more information on User and Roles, read Role Definitions in Peak.
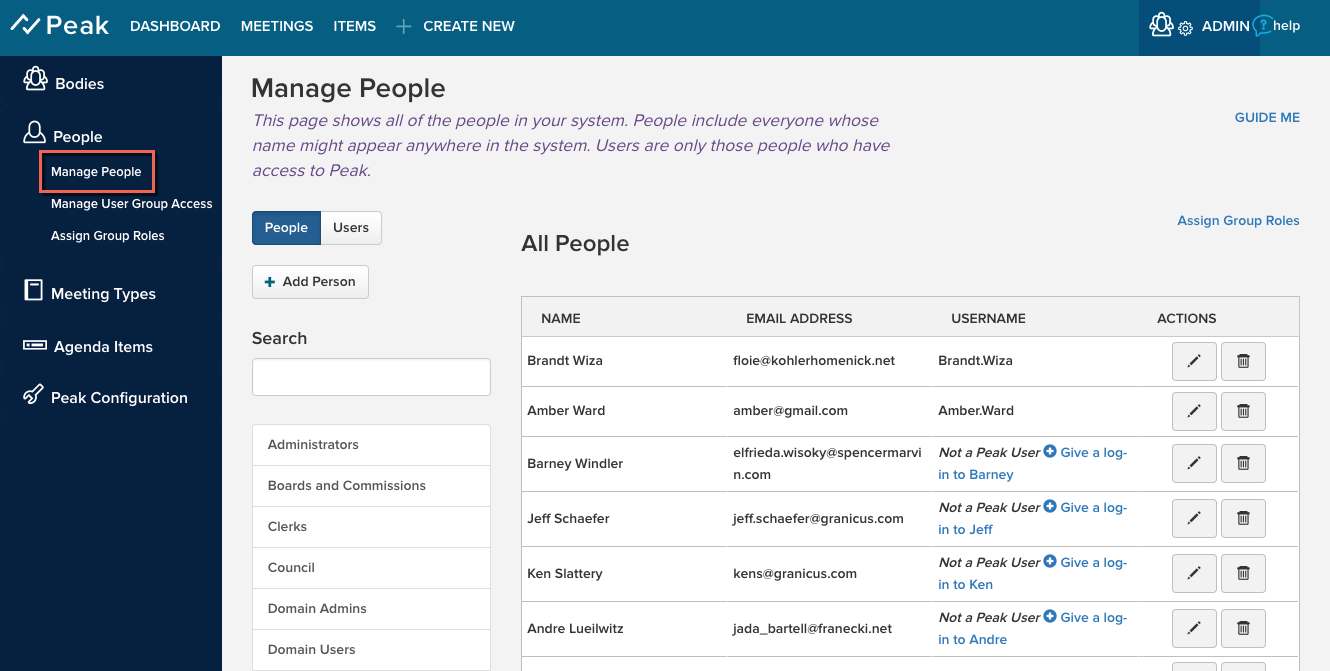
From here, you can edit, delete, or add people.
 |
|
 |
To delete a person, click the trash can.
|
 |
To add a new person, click the Add Person button in the upper left of the screen.
|
Note: For jurisdictions that use both Peak and Boards and Commissions, when a new applicant creates an application (and thus a new People record) in Boards and Commissions, a corresponding People record is automatically created in Peak. This Peak record is created even if the applicant doesn't submit the application and uses the Save for Later feature instead; if such an applicant enters an email address but no name, then the Peak record displays a blank name, which can look odd to Peak Administrators.
Warning: If you delete a Peak People record, then the person's name is removed from anywhere else in Peak it is listed (such as in Item fields) and replaced with a unique identifier, which displays as a long string of letters and numbers. Once deleted, a Peak People record and its associated name cannot be recovered. For jurisdictions that also use Boards and Commissions, the corresponding Boards and Commissions record is automatically deleted as well. For these reasons, we recommend that Peak Administrators exercise great caution when deleting Peak People records, and only delete records that were created in error and have not been used. However, if a Boards and Commissions People record is deleted in error, a Boards and Commissions Administrator can restore the record; see Restoring Deleted Items for more details.
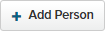
Only a platform administrator can create user accounts. To create a user account for a given person, click Give a log-in to . . . next to that name.

The Roles menu enables you to assign a role. Select a role from the menu, then click Generate Log-In.
Clicking Generate Log-In creates a user login for the person record, and Peak will send an email to the address entered in the Email Address field for the person record. The email contains the following:
- A welcome message with instructions and a link to set the initial password
- The user's role in Peak and an explanation of what that role can do (as well as a link to the corresponding Granicus Help Center page)
- Instructions on how to log in to Peak once the user has set a password
If the Peak user login or password needs to change at any point, a platform administrator can take that action at the platform level using the Users and Groups menu option on the Apps drop-down menu.
How to add and edit Users
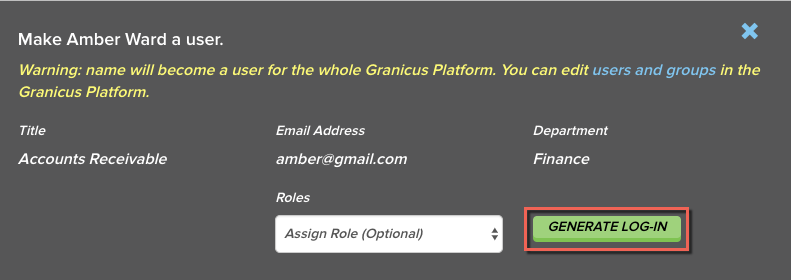
Click the Users tab at the upper left to view only those individuals who have Peak user accounts. The All Users view contains a list of all users imported from the Granicus Platform, as well as any new users created via this procedure within Peak:
From this page, you can view and change users' roles, and add people.
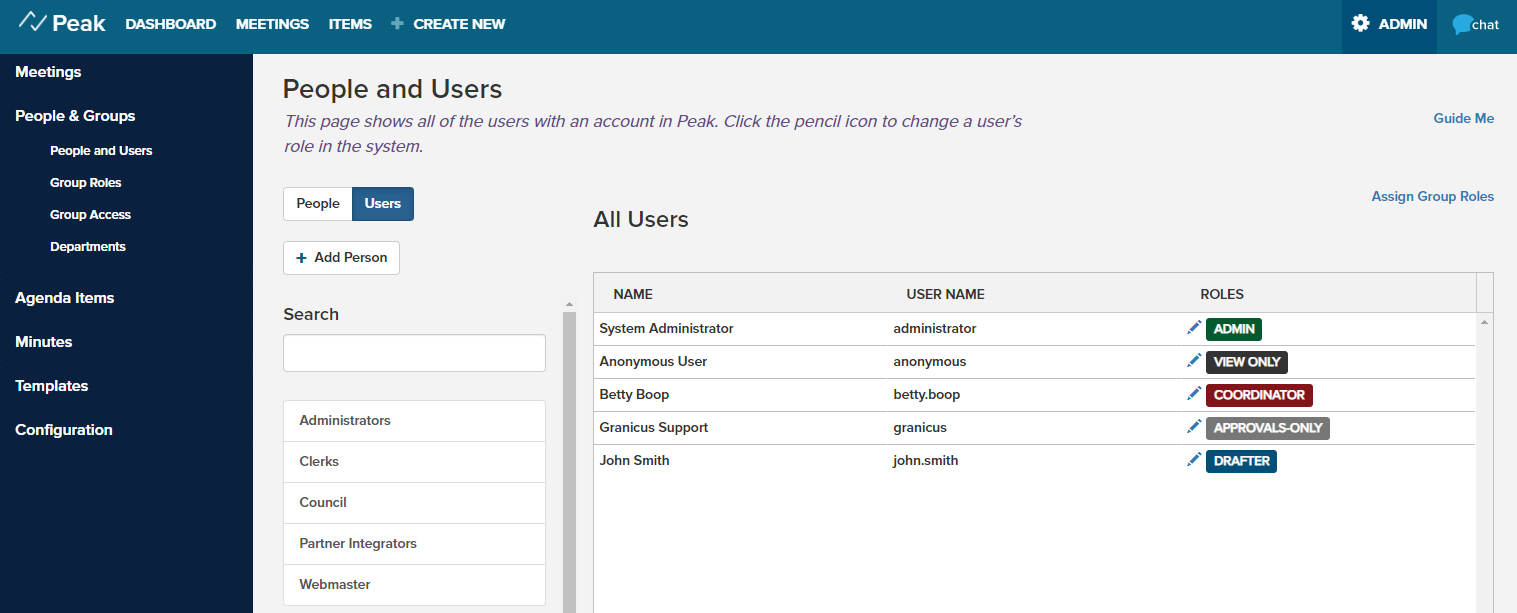
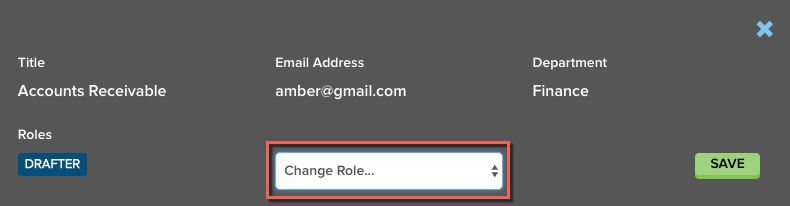
To change a user's role, click the Pencil icon next to the role label. A detail frame will appear, as shown below. Choose a new role from the drop-down menu. Click the green Save button at the lower right to save changes for this user. Please note that this modal will change a user's individual role, which will show as the user's role badge if a group role user is assigned. Remember, highest role wins whether individual role or a role assigned to a group to which the user is a part of.
To add a new person, click the +Add Person button at the upper left on the Users page. This will take you to the Create a New Person form:
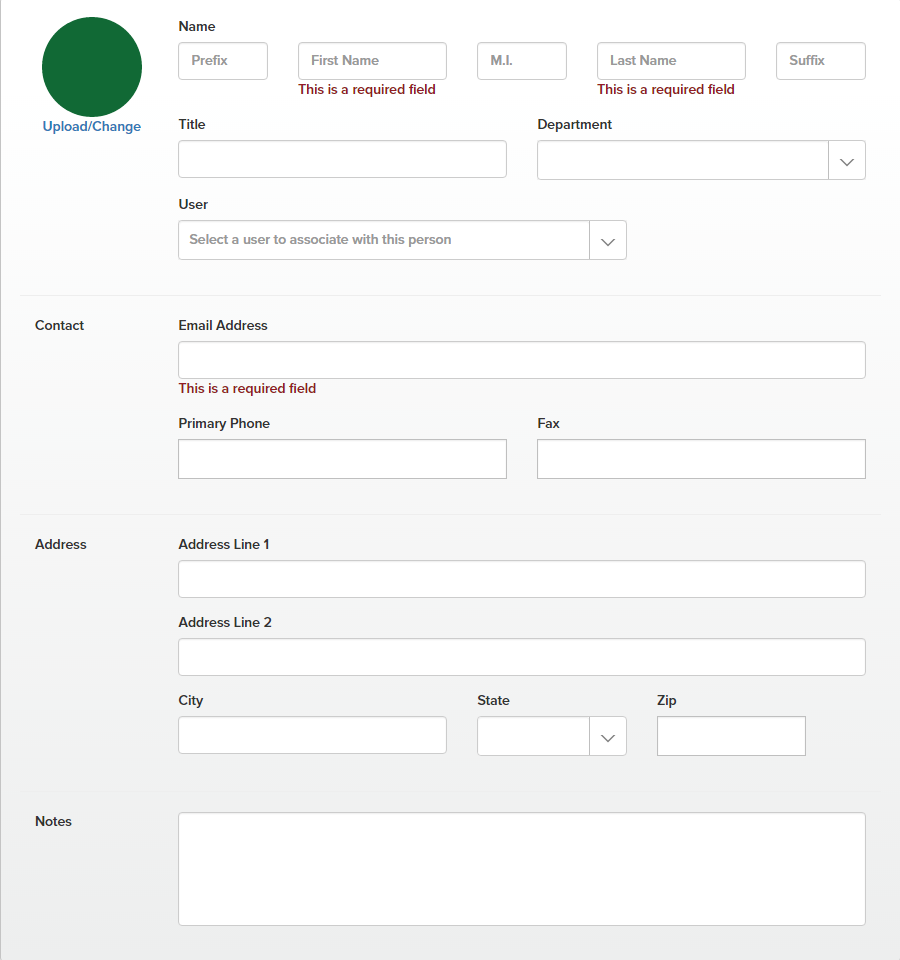
Fill in the details for your new person. First Name, Last Name, and Email Address are required fields:
| Field | Action |
|
|
|
|
Name
|
Click each field to add a prefix, first name, middle initial, last name, and suffix as needed.
|
| Title | Click the field, then add the title. |
| Department | Use the drop-down menu to select which department the person belongs to. The list is populated with the departments set up in Peak. If you do not yet have departments set up, you can go back later to add one by editing the person/user. |
| User | You can assign an existing Peak user to your person record. This is useful for users that were imported from your Granicus platform and do not have associated people records. Click the User drop-down menu and choose the user you want to link to this person. |
| Contact | Click within the fields, then enter email address (required), phone, and fax, if applicable. Be sure to enter a correctly formatted email address, as this is needed to create a user login. This email address will be used to send approval notification emails for any items this user is assigned in an approval workflow. |
| Address | Click within the fields, then enter address information for this person. |
| Notes | Click within the field, then enter any notes you wish to store for this person. |
Click Save at the bottom right to save the new person record to the system. The record now displays in the list of all people.

