Use the instructions in this article to create agenda items and attach them to specific meeting bodies and meetings. This functionality is available to users with an Admin, Agenda Coordinator, or Drafter role.
First, the Admin needs to create one or more agenda item templates. Read Customized Agenda Item Templates for more information on how to create an agenda item template.
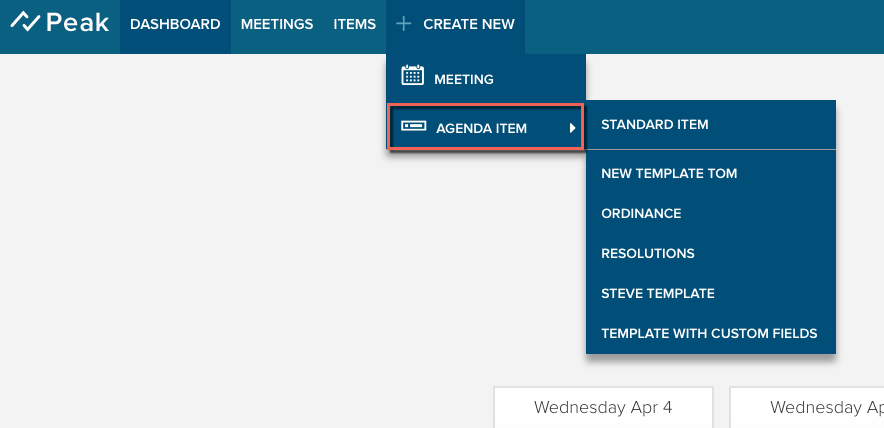
1. To create an agenda item, click Create New on the Peak navigation bar, then choose Agenda Item (Figure 1). If you have created custom agenda item templates, the default template will be listed at the top followed by the custom templates (Figure 2).

Figure 1

Figure 2
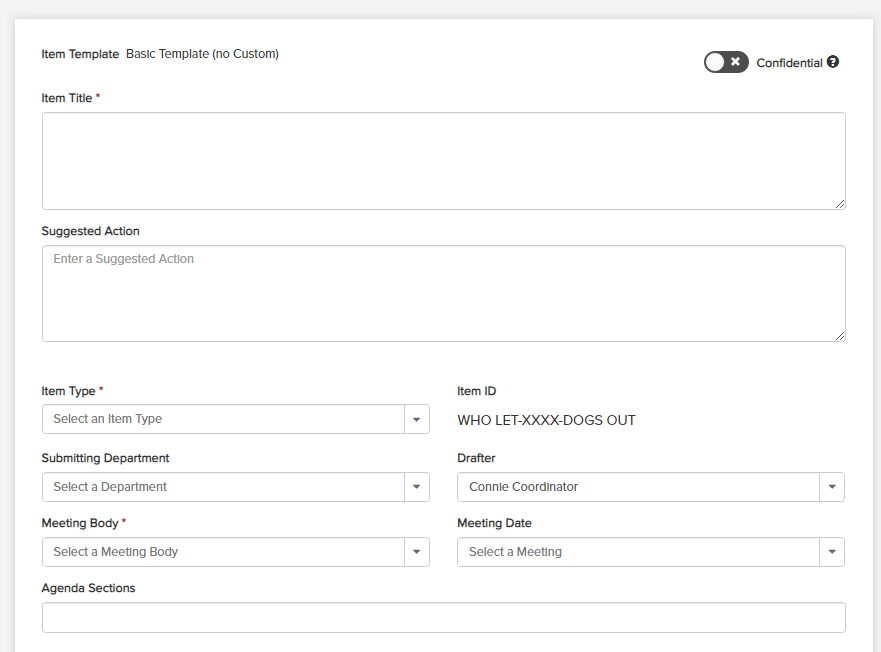
The following figure 3 illustrates the fields on the Agenda Item Details page. Required fields are indicated by a red asterisk.

Figure 3
2. Enter the details for your agenda item, described in the table below.
| Feature | Action |
| Item Template | Lists the item template in use for this item. |
| Confidential | Activate this toggle if you wish to make this item confidential (in that it will not appear on agenda reports or one For Public agenda packets). The item will be available on 'For Council Agenda Packets'. |
| Item Title |
Click the field, then type the name of the agenda item. If rich text editor formatting is turned on, you can format using font, size, bold, italic, strikethrough, underline, color, and bullet or numbered lists. This field has a fifty-thousand-character limit. You can confirm that rich text is enabled by visiting your Site-Wide Settings page and locating Default Font and Point Size.
Note: If you wish to use rich text editor formatting contact your Granicus Account Representative.
|
|
Suggested Action
|
Click the field, then type a suggested action for your agenda item. If rich text editor formatting is turned on, you can format using font, size, bold, italic, strikethrough, underline, color, and bullet or numbered lists. This field has a five-thousand-character limit. You can confirm that rich text is enabled by visiting your Site-Wide Settings page and locating Default Font and Point Size.
Note: If you wish to use rich text editor formatting contact your Granicus Account Representative.
|
|
Item Type
|
Select an item type from the drop-down menu.
|
|
Item ID
|
This is the unique tracking number that the system automatically assigns to each item. Please note that while you are drafting an item, the ID will show format only; a number will be assigned once you click Create.
|
|
Submitting Department
|
Use the drop-down menu to select which department is submitting the agenda item.
|
| Drafter |
The Drafter field is auto-populated with the name of the current user. You can change the drafter to another name by clicking on the drop-down menu, but after saving, you will no longer have access to this item as the drafter. Whomever you have reassigned as drafter of the agenda item will be able to edit the details.
This menu contains all users with the roles of Drafter, Agenda Coordinator, and Admin.
|
|
Meeting Body
|
Use the drop-down menu to select a target meeting body for the agenda item.
|
|
Meeting Date
|
This drop-down menu contains a chronological list of all future meetings up to approximately one year associated with the body selected in the Meeting Body menu. Click the menu and choose the meeting date for this agenda item.
|
|
Agenda Sections
|
This drop-down menu is populated with the sections of the agenda for the meeting selected in the Meeting Date menu. The sections will be based on the structure of the meeting type used for the meeting at the time of its creation. Click the menu and select which section of the agenda this item should be attached to. You can add the item to multiple sections by selecting more sections from the menu. Remove a section by clicking the x next to its name.

|
3. Enter information into any custom fields on the item template set up by a Peak Admin.
4. Add attachments if applicable. You can rename your attachments and specify the level of privacy desired. Each attachment can be up to 200 MB in size, but very large packets with a large number of attachments may fail to generate. Most Windows- and Mac-based file types are supported (see a full list of supported file types here), although packet generation will not work with encrypted files. All files will be converted to PDF for packet generation.
|
Attachments
|
Click Browse Your Computer to browse locally for files, or you can drag-and-drop files anywhere within the box.

|
|
Attachment Name
|
Your upload will show as pending. Click the Attachment Name field to rename the attachment if necessary.

|
|
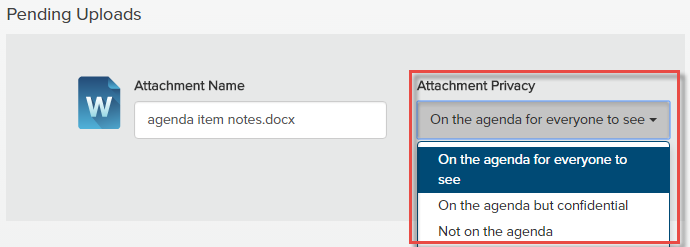
Attachment Privacy
|
Now, click the Attachment Privacy drop-down menu and choose the appropriate level of privacy for this attachment: On the agenda for everyone to see, On the agenda but confidential, or Not on the agenda.

|
5. Choose whether you want to set up an approval workflow at this time (Figure 4). This box might already be selected if your Peak Admin has enabled a setting on your Site-Wide Settings page. You can also do this later by editing an existing agenda item. To set up approvals, click the Set up Approvals checkbox before you click Create.

Figure 4
6. Click the green Create button to create your item with the details and attachments your meeting details and attachments—attachments are not uploaded until you click Create.


